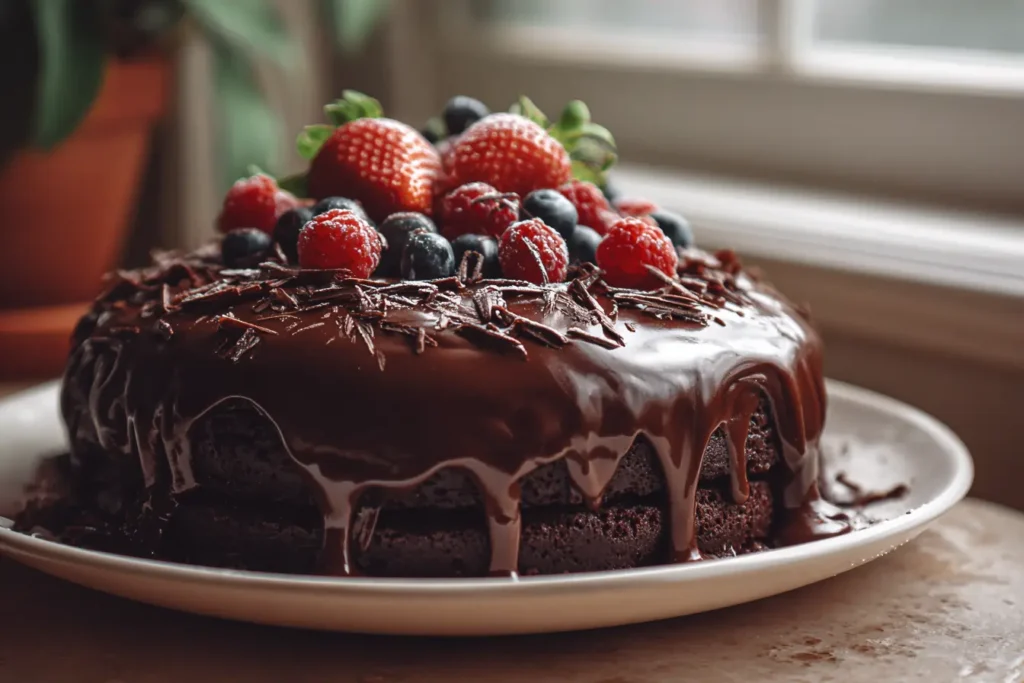
Chocolate ganache cake was the birthday move I made last year when I wanted something dramatic but didn’t want to spend the whole day frosting like I was auditioning for a baking show. I carried that chocolate ganache cake to the table with my best “oh this old thing?” face, even though I’d been peeking through the oven door like a nervous raccoon for 30 minutes.
Here’s what happened: the first slice came out clean, the ganache was glossy like a fancy shoe, and everyone went quiet for that first bite. Then someone asked where I “ordered it from.” That’s the sweet spot, right? Something that looks bakery-level, tastes rich and dreamy, and is secretly… very doable in a regular, slightly chaotic home kitchen.
Most people think ganache cakes are complicated or require pastry-school confidence and a ruler. They don’t. This recipe walks you through the moist chocolate layers, the silky ganache, how to stack without stress, and how to fix the most common ganache panics before they spiral. You’ve got this.
Table of Contents
Table of Contents
Quick Overview – chocolate ganache cake
- Prep Time: 25 minutes
- Cook / Chill Time: 50 minutes
- Total Time: 1 hour 15 minutes
- Servings: 12 slices
- Difficulty: Beginner-friendly
Why You’ll Love This chocolate ganache cake
- Simple pantry ingredients with easy swaps—no weird specialty stuff you’ll use once and resent forever.
- A foolproof ganache method that turns out smooth and glossy (even if you’re a little heavy-handed with the whisk… ask me how I know).
- Make-ahead friendly for birthdays, holidays, and those “I volunteered to bring dessert and now I regret everything” moments.
- Bakery-style look without the bakery-style stress. The ganache does most of the decorating for you.
- Rich, moist chocolate layers balanced with silky, decadent ganache that tastes like pure celebration.
If you’re building your personal dessert “greatest hits,” you might also like: best chocolate Espresso cake recipes and easy Eggless Chocolate Frosting.
Print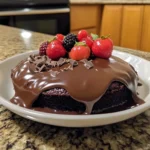
Easy Chocolate Ganache Cake: Perfect in 5 Simple Steps
- Total Time: 75 minutes
- Yield: 12 slices 1x
- Diet: Vegetarian
Description
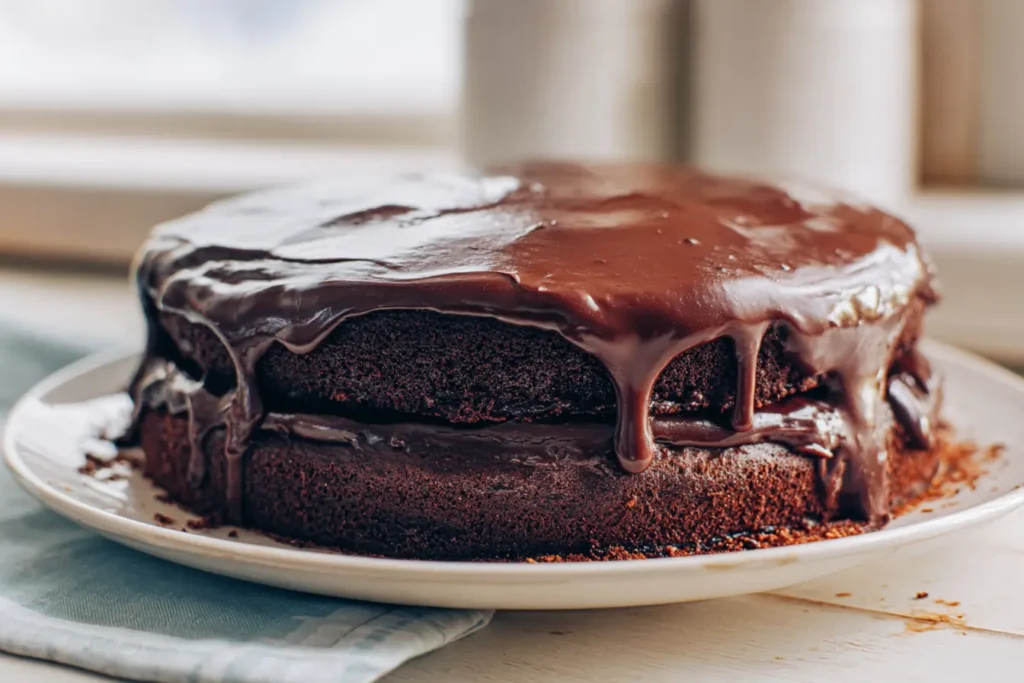
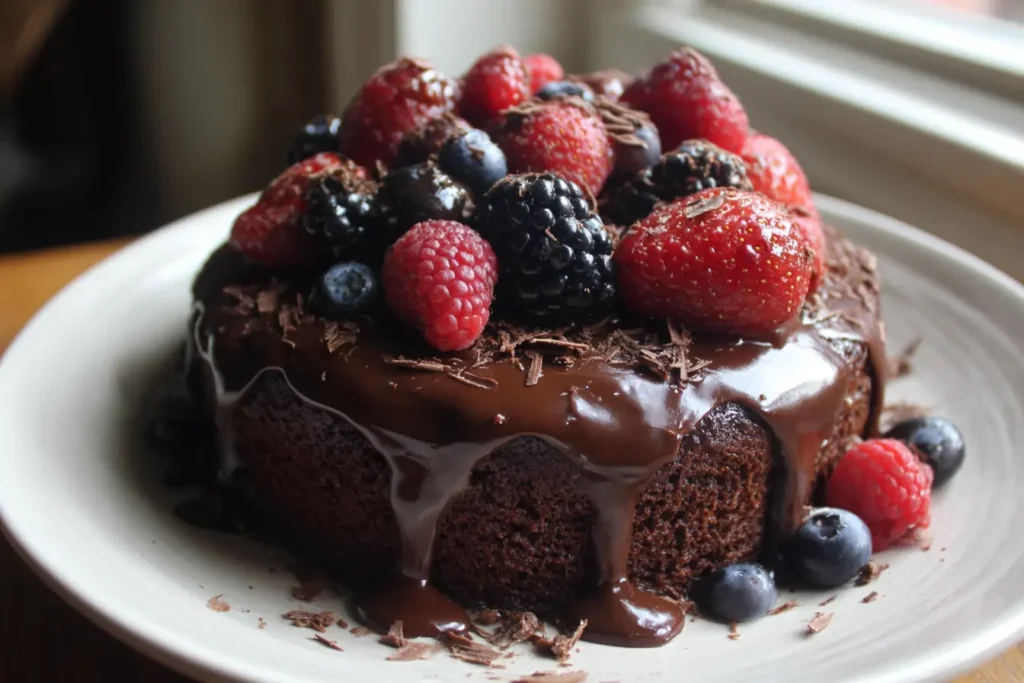
This Chocolate Ganache Cake is dramatic in the best way—moist chocolate layers with a silky, glossy ganache that looks bakery-level but is totally doable at home. Beginner-friendly steps, simple ingredients, and pro tips for perfect drips and clean slices—every time.
Ingredients
CAKE
2 cups all-purpose flour
3/4 cup unsweetened cocoa powder
2 cups granulated sugar
2 tsp baking powder
1 1/2 tsp baking soda
1 tsp salt
2 large eggs (room temperature)
1 cup buttermilk (or milk + 1 tbsp lemon juice/vinegar)
1/2 cup neutral oil (canola/vegetable)
1 cup hot coffee (or hot water)
GANACHE
12 oz dark or semi-sweet chocolate (chopped or chips)
1 cup heavy cream
1 tbsp butter (optional, for extra shine)
1/2 tsp vanilla extract (optional)
Pinch of salt
Instructions
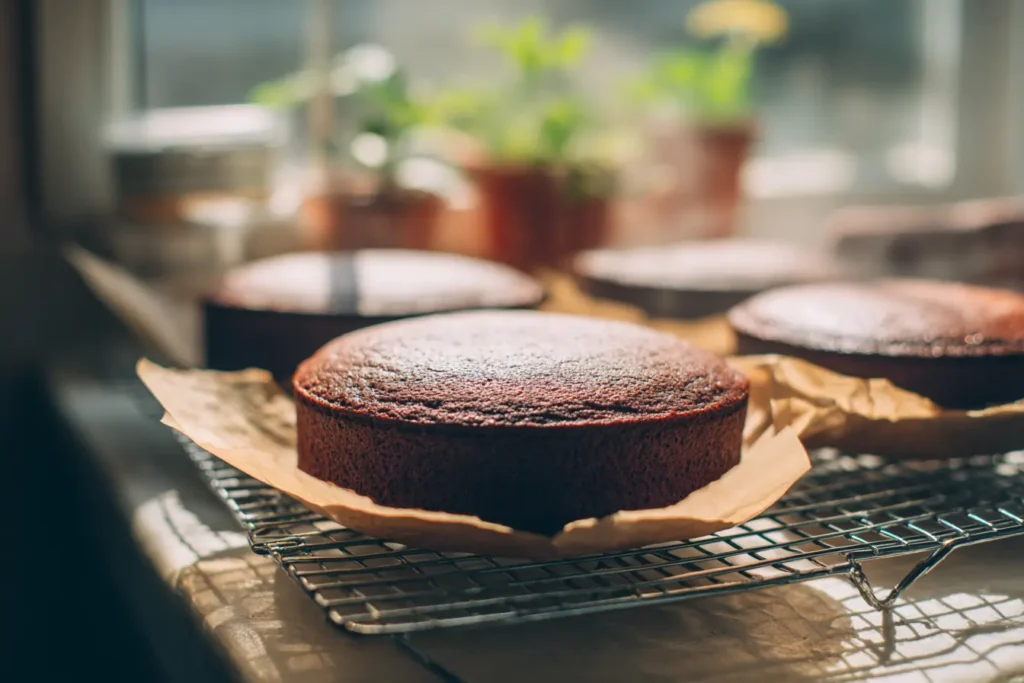
1. Preheat oven to 350°F (175°C). Grease two 8-inch or 9-inch round cake pans and line bottoms with parchment.
2. In a large bowl, whisk flour, cocoa powder, sugar, baking powder, baking soda, and salt.
3. Add eggs, buttermilk, and oil. Whisk until smooth.
4. Slowly pour in hot coffee (or hot water) while whisking until combined. Batter will be thin—this is correct.
5. Divide batter evenly between pans. Bake 30–35 minutes, or until a toothpick comes out with a few moist crumbs.
6. Cool in pans 10 minutes, then turn out onto a rack and cool completely.
7. Make ganache: place chocolate in a heatproof bowl. Heat cream until steaming and just barely simmering (don’t boil hard).
8. Pour hot cream over chocolate. Let sit 2–3 minutes without stirring.
9. Whisk from the center outward until glossy and smooth. Stir in butter/vanilla/salt if using.
10. Let ganache cool to desired thickness: pourable when warm; spreadable when thicker (like soft peanut butter).
11. Assemble: spread a thick layer of ganache on one cake layer, add the second layer on top.
12. Frost top and sides with ganache (or pour for a drip look).
13. Chill 20–30 minutes to set for cleaner slices. Slice with a warm knife for bakery-neat cuts.
Notes
Cool the cake layers completely before frosting—warm cake will make ganache slide.
If ganache looks grainy or split, whisk in 1–2 tsp warm cream and mix gently (an immersion blender can help).
If ganache is too runny, let it sit and thicken; if too thick, warm in 5–10 second bursts, stirring between.
Storage: cover and refrigerate up to 5 days; let slices sit out 20–30 minutes before serving for best texture.
Make-ahead: bake layers 1 day ahead; assemble day-of for the glossiest finish.
- Prep Time: 25 minutes
- Cook Time: 50 minutes
- Category: Dessert
- Method: Baking
- Cuisine: American
Nutrition
- Serving Size: 1 slice
- Calories: 520 kcal
- Sugar: 44g
- Sodium: 420mg
- Fat: 28g
- Saturated Fat: 14g
- Unsaturated Fat: 12g
- Trans Fat: 0g
- Carbohydrates: 70g
- Fiber: 4g
- Protein: 7g
- Cholesterol: 85mg
Ingredients for chocolate ganache cake
Exact measurements will be in the recipe card on your site, but here are the key players (and why they matter) so you can shop smart.
For the cake:
- All-purpose flour: The structure. Nothing fancy needed.
- Unsweetened cocoa powder: This is where the deep chocolate flavor starts. Use a decent one—your cake will taste like it.
- Sugar: Sweetness and moisture.
- Baking powder + baking soda: Lift and tenderness.
- Salt: Not optional. It makes chocolate taste more like chocolate.
- Eggs (room temp): They mix in more smoothly. Cold eggs can make batter look a little curdled.
- Buttermilk (or substitute): Helps make the crumb soft and tender.
- Neutral oil: Keeps the cake moist even after a day in the fridge.
- Hot coffee or hot water: It “blooms” the cocoa so the chocolate flavor gets louder. Coffee won’t make it taste like a latte—promise.
For the ganache:
- Dark or semi-sweet chocolate (chopped or chips): Quality matters here because ganache is basically chocolate wearing a silk dress. For a helpful deep dive on chocolate and baking basics, King Arthur Baking is reliable.
- Heavy cream: The magic that turns melted chocolate into a luscious glaze/frosting.
- Butter (optional but lovely): Adds shine and a smoother mouthfeel.
- Pinch of salt or a splash of vanilla: Small thing, big difference.
Tools that make life easier: two 8-inch or 9-inch cake pans, parchment paper, mixing bowls, a whisk, and an offset spatula (or a butter knife you pretend is an offset spatula).
Ingredient Substitutions & Variations – chocolate ganache cake
This is a very flexible situation. Your kitchen, your rules.
Chocolate options (for ganache):
- Semi-sweet vs. dark: Semi-sweet gives a classic, crowd-pleasing sweetness. Dark makes it more intense and “grown-up.” Both work for this chocolate ganache cake.
- Milk chocolate: Totally doable, but the ganache will be softer and sweeter. You may want a little less cream.
- White chocolate ganache: A different vibe, but gorgeous. White chocolate is fussier (it can scorch), so use gentle heat and patience.
Dairy swaps:
- No buttermilk? Mix milk with a little lemon juice or vinegar and let it sit for 5 minutes.
- For a dairy-free ganache: Use full-fat coconut cream and dairy-free chocolate. It sets a bit softer but still tastes dreamy.
- For a dairy-free cake: Use plant milk soured with lemon + a neutral oil (and check your chocolate labels).
Cake variations:
- Box mix shortcut: If you’re short on time, use your favorite chocolate cake mix and still make the ganache from scratch. Nobody needs to know.
- Vanilla cake + chocolate topping: Make vanilla layers and pour the ganache over the top. It’s that classic birthday-sheet-cake energy, but fancier.
Flavor add-ins (pick one, don’t go wild):
- Espresso powder: Just a teaspoon in the batter makes the chocolate taste deeper.
- Orange zest: Bright and fancy.
- Peppermint extract: A tiny splash in the ganache for winter parties.
- A tablespoon of liqueur (like Baileys or Frangelico) in the ganache: Very “grown-up dessert table.”
How to Make chocolate ganache cake
Okay, here’s the thing about ganache: it’s not hard. It’s just particular about temperature. Once you respect that, it becomes the easiest “wow” factor in your dessert life.
1. Prep your pans and oven
Grease two round cake pans and line the bottoms with parchment. Preheat your oven.
Quick tip before we move on: parchment is the difference between “beautiful layers” and “I guess we’re doing a trifle now.”
2. Mix the dry ingredients
Whisk together flour, cocoa powder, sugar, baking powder, baking soda, and salt in a big bowl. No need to sift unless your cocoa is super clumpy.
3. Add the wet ingredients (then the hot coffee)
Add eggs, buttermilk, and oil. Mix until smooth.
Then slowly pour in hot coffee (or hot water) while whisking. The batter will be thin. That’s correct. Thin batter = moist cake. Trust me on this.
4. Bake
Divide batter evenly between pans and bake until a toothpick comes out with a few moist crumbs (not wet batter).
Let the cakes cool in the pans for about 10 minutes, then turn them out onto a rack to cool completely.
5. Make the ganache
Place chopped chocolate in a heatproof bowl. Heat heavy cream until it’s steaming and just barely simmering—no aggressive boiling.
Pour the hot cream over the chocolate. Don’t touch it for 2–3 minutes. Let it melt quietly like it’s in a spa.
Then whisk from the center outward until smooth and glossy. Add butter or vanilla if using.
For ganache ratios and why they work, Serious Eats has a great explanation.
6. Fill and stack
Once cakes are fully cool, level them if needed (or don’t—ganache covers a lot of sins).
Spread a thick layer of ganache between the layers. Add the top layer.
7. Ganache the outside
Let ganache cool to your preferred thickness:
– Pourable glaze: slightly warm, flows easily
– Spreadable frosting: cooled and thicker, like soft peanut butter
Spread over the top and sides. If you want drips, use slightly warmer ganache and nudge it to the edges.
8. Chill briefly to set
Pop the assembled cake in the fridge for 20–30 minutes so the ganache sets and slicing is cleaner.
If you’re ever unsure about doneness (or oven temps being chaotic), Bon Appétit’s basic cake guidance is a solid reference.
Pro Tips & Common Mistakes – chocolate ganache cake
I’ve made this chocolate ganache cake enough times to have personally explored several unnecessary disasters. Learn from my chaotic energy.
– Don’t ganache a warm cake.
If the layers are even a little warm, the ganache will slide around like it’s trying to escape. Cool completely. Fully. No shortcuts.
– Thin batter isn’t a problem.
This cake batter is looser than you might expect. That’s what keeps the crumb moist and rich.
– Your ganache looks broken or grainy?
Usually the cream was too hot, or the chocolate overheated. Fix: add 1–2 teaspoons of warm cream and whisk gently. If it’s really stubborn, use an immersion blender to smooth it.
– Ganache too runny to frost?
Let it sit at room temp and thicken. If you’re impatient (me), stir every few minutes to speed it along.
– Ganache too thick?
Warm it in 5–10 second bursts in the microwave (stir well between bursts). Gentle is the whole theme here.
– Leveling is optional, not a moral test.
If your layers dome, you can trim them. Or you can stack them and use extra ganache to even things out. I support either lifestyle.
– Want clean slices?
Chill the cake, then slice with a warm knife (run it under hot water, wipe dry). It feels fancy and makes you look extremely competent.
For more general frosting help, chocolate frosting techniques (internal link) is a good one to keep bookmarked.
Storage, Make-Ahead & Freezing – chocolate ganache cake
This chocolate ganache cake keeps really well, which is excellent news if you like “dessert now, dessert later” as a life philosophy.
- Room temperature: If your kitchen is cool, you can keep it covered for up to 1 day. The ganache may soften a bit.
- Fridge: Store covered for up to 5 days. The cake will be firmer when cold, so let slices sit out 20–30 minutes before serving for the best texture.
- Make-ahead: Bake the layers a day ahead, wrap well, and keep at room temp or refrigerated. Make ganache the day you assemble for the glossiest finish.
- Freezing: Wrap unfrosted layers tightly and freeze up to 2 months. Thaw overnight in the fridge, then assemble. You can freeze the finished cake, but the ganache can lose a little shine after thawing—still delicious, just less “mirror glaze” vibes.
Serving Suggestions – chocolate ganache cake
Now for the fun part—serving and pretending you’re not secretly proud of yourself.
- Classic: A big slice of cake with black coffee or strong tea. The bitterness balances the sweetness perfectly.
- Extra cozy: Serve slightly room temp with a glass of cold milk. Childhood magic, but with better chocolate.
- Fancy-but-easy: Add fresh raspberries or sliced strawberries on the plate. That tart bite makes the chocolate pop.
- Ice cream moment: Vanilla ice cream + a slice of cake is basically a standing ovation.
- Party trick: Sprinkle flaky salt on top of the ganache right before it sets. People will act like you have a cookbook deal.
FAQ’s about chocolate ganache cake
What’s the difference between chocolate ganache and chocolate frosting?
Ganache is mainly chocolate and cream. It can be a glaze, a drip, or a frosting depending on temperature and ratio. Traditional frosting usually has powdered sugar and is fluffier. For a chocolate ganache cake, ganache gives you that smooth, rich, truffle-like finish.
Can I use chocolate chips for ganache?
Yes. Chips have stabilizers, so they sometimes melt a little less smoothly than chopped bars, but they still work. If your ganache looks a tiny bit grainy, whisk gently and give it a minute to come together. Using better-quality chips helps.
Why did my ganache turn oily or split?
Usually overheating. Either the cream was boiling hard or the chocolate got too hot. Let it cool a bit, then whisk in a splash of warm cream to bring it back. Slow and steady wins the glossy race.
Can I make this cake as a sheet cake or cupcakes?
Absolutely. Bake as a 9×13 for a more casual version, or as cupcakes for a party. You can still pour ganache on top or dip the cupcake tops for that shiny finish.
Does the coffee make it taste like coffee?
Nope. It just deepens the chocolate flavor. If you’d rather not use it, hot water works fine—you’ll still get a great chocolate ganache cake.
How do I get super clean layers when I slice?
Chill the cake first so the ganache sets. Use a hot, dry knife and wipe between cuts. It’s a small thing that makes the slices look bakery-neat.
Final Thoughts – chocolate ganache cake
If you’ve been intimidated by the whole idea of a glossy, layered, “who made this?” dessert, let this be your sign to go for it. The cake layers are forgiving, the ganache is simpler than it looks, and the end result feels downright celebration-worthy.
Make it for a birthday, a dinner party, a random Tuesday, or just because you want your kitchen to smell like warm chocolate and good decisions. This chocolate ganache cake is the perfect dessert for any celebration—and it’s even better when you’re the one who gets to cut the first slice.