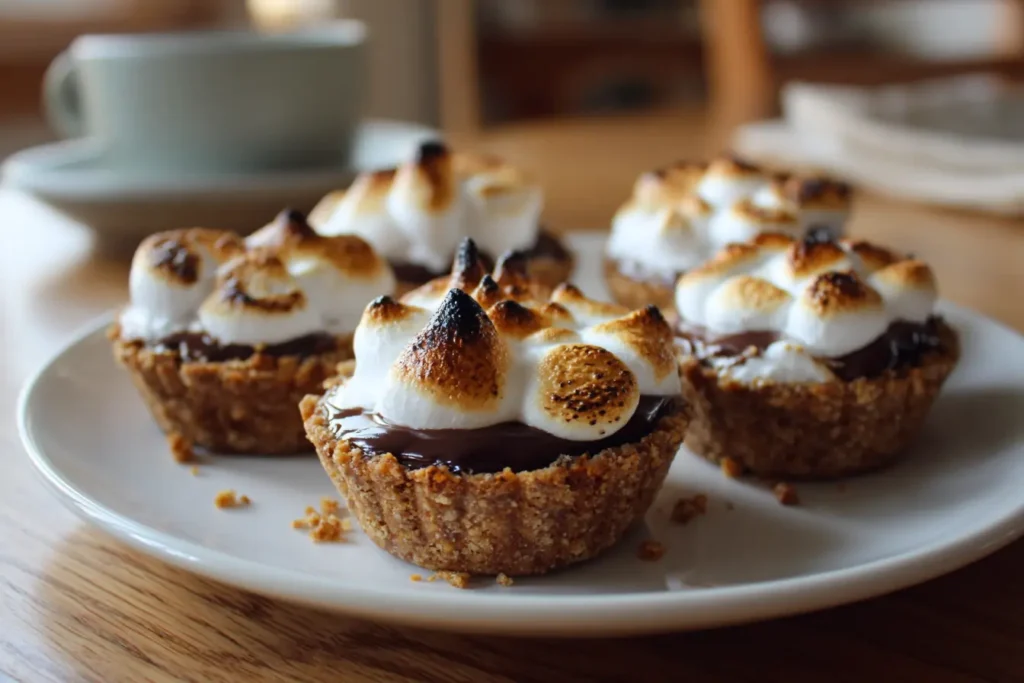
Mini Smores Pies were one of those desserts I thought would be impossible to mess up. Chocolate, marshmallows, graham crackers… how hard could it be?
Turns out, very hard 😅. The first time I made them, the marshmallows burned, the chocolate refused to melt, and I stood in my kitchen laughing at myself while eating a very ugly—but still delicious—mini pie.
That’s honestly why I love cooking so much. I test, I fail, I tweak, and eventually I figure it out. After a few rounds (okay, more than a few), these mini smores pies became my go-to cozy dessert—gooey, foolproof, and the kind that disappears faster than I can get them on the table.
Table of Contents
Table of Contents
Mini Smores Pies at a Glance (Fast Success)
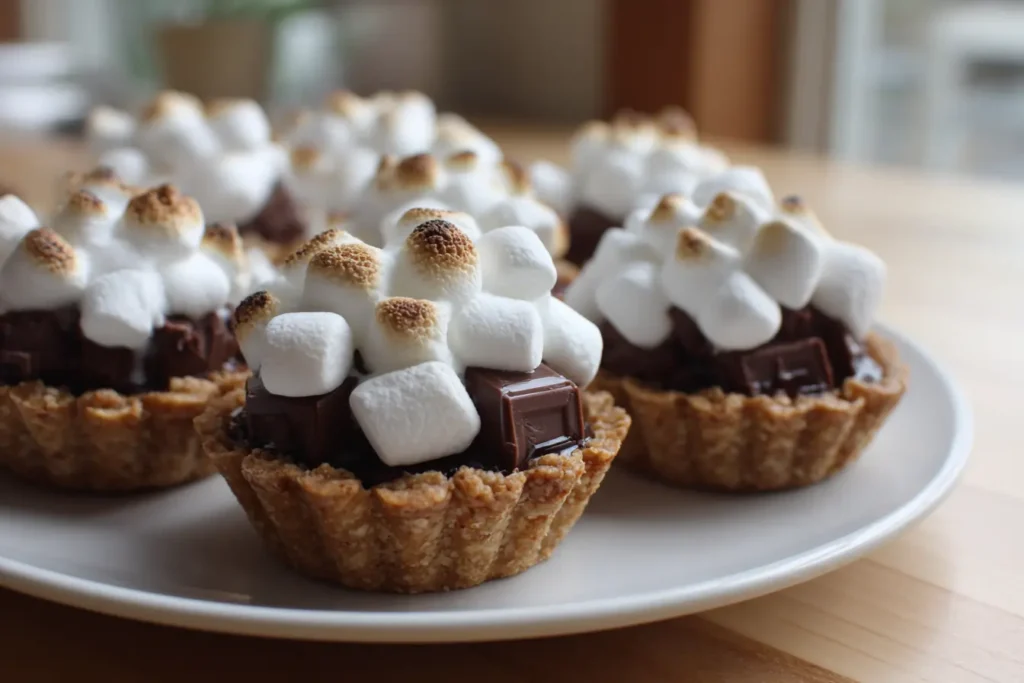
These mini smores pies are a simple three-layer dessert: a crisp graham cracker crust, melty chocolate, and a toasted marshmallow top. Cozy, nostalgic, and way easier than they look.
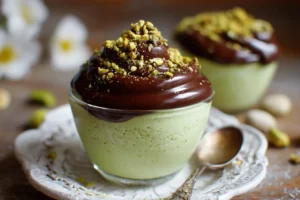
If you already love mini desserts like my white chocolate mousse tartlets, this recipe follows the same foolproof, party-friendly idea—just with classic s’mores flavors.
Time, Yield & Equipment
- Prep: 10–15 minutes
- Bake: 5–10 minutes
- Cool: 10–20 minutes
- Yield: 12 mini pies
Best pan: standard muffin tin
(Silicone cups or mini tart pans also work.)
The 3-Layer Formula (Don’t Skip This Order)
- Crust – gives structure
- Chocolate – melts into the base
- Marshmallow – toasts on top
Changing the order is the fastest way to get uneven melting or burnt tops.
If you love crust-based desserts, you’ll recognize this method from my go-to graham cracker crust guide.
Choose Your Gooey Level
| Texture | What It’s Like | Best For |
|---|---|---|
| Soft-set | Melty, holds shape | Easy serving |
| Lava | Ultra-gooey | Photos & wow |
| Firm | Neat, sliceable | Parties |
Most of this comes down to cooling time, not extra baking.
Common Problems (Quick Heads-Up)
- Burnt marshmallows: heat too strong
- Chocolate not melting: wrong chocolate type
- Soggy crust: not packed firmly enough
Don’t worry—we’ll fix all of this as we go.
Print
Mini Smores Pies
- Total Time: 15–20 minutes
- Yield: 12 mini pies 1x
- Diet: Vegetarian
Description
Mini Smores Pies are irresistible little dessert bites made with a crisp graham cracker crust, melty chocolate, and a perfectly toasted marshmallow top. They’re easy, foolproof, and bring all the cozy s’mores flavor—no campfire required. Perfect for parties, family gatherings, or whenever a chocolate craving hits.
Ingredients
For the Graham Cracker Crust
-
1 cup graham cracker crumbs
-
3 tablespoons unsalted butter, melted
For the Filling
-
12 squares milk chocolate (or dark chocolate), about 1–2 per pie
-
1 to 1½ cups mini marshmallows
Instructions
-
Preheat the oven to 350°F (175°C) and lightly grease a standard muffin tin or line with muffin liners.
-
In a bowl, mix graham cracker crumbs with melted butter until the mixture looks like damp sand.
-
Press about 1 tablespoon of the crust mixture firmly into the bottom of each muffin cup.
-
Place 1–2 squares of chocolate flat on top of each crust.
-
Sprinkle mini marshmallows evenly over the chocolate.
-
Bake for 5–7 minutes, just until the chocolate is melted and the marshmallows puff up.
-
For a golden top, broil for 10–20 seconds, watching closely to avoid burning.
-
Let the mini smores pies cool for 5–15 minutes before removing from the pan.
Notes
-
Chocolate bars melt smoother than chocolate chips.
-
Mini marshmallows toast more evenly than large ones.
-
Cooling time controls texture: less cooling = gooier center.
-
Silicone muffin cups make removal easiest.
- Prep Time: 10 minutes
- Cook Time: 5–7 minutes
- Category: Dessert
- Method: Baking
- Cuisine: American
Nutrition
- Serving Size: 1 mini pie
- Calories: 180
- Sugar: 16 g
- Sodium: 95 mg
- Fat: 9 g
- Saturated Fat: 5 g
- Unsaturated Fat: 3 g
- Trans Fat: 0 g
- Carbohydrates: 24 g
- Fiber: 1 g
- Protein: 2 g
- Cholesterol: 15 mg
Ingredients That Guarantee Gooey Results
Mini s’mores pies are simple, but ingredient choices make or break them. The goal is melty (not chalky) chocolate, toasted (not burnt) marshmallows, and a crust that actually holds together.
Best Chocolate for Mini Smores Pies
For the most reliable melt, choose one of these:
- Chocolate bar (broken into squares) → melts smoothly and evenly
- Chocolate chunks → good melt with a rustic texture
- Chocolate chips → work, but melt slower and stay chunkier
If gooey centers matter to you, chocolate bars are the safest option.
Marshmallow Options: Melt vs Toast vs Burn
Each option gives a slightly different finish:
- Mini marshmallows: toast evenly and are easiest to control
- Large marshmallows (cut): bold look, but need careful watching
- Marshmallow fluff: soft, glossy top with very light browning
Graham Cracker Crust Options
You have two solid choices:
- Homemade crumbs: best flavor and structure
- Store-bought crusts: fastest, slightly softer texture
Homemade gives you more control, but both will work if packed firmly.
Quick Ingredient Decision Table
| Ingredient | Best Choice | Why |
|---|---|---|
| Chocolate | Bar squares | Even, gooey melt |
| Marshmallow | Mini marshmallows | Toast without burning |
| Crust | Homemade crumbs | Crisp, sturdy base |
Once these basics are right, the rest of the recipe becomes almost foolproof.
The Foolproof Graham Cracker Crust (No Soggy Bottoms)
This crust does one job: hold everything together without getting soggy. You don’t need perfection—just the right ratio, a firm press, and a quick set.
The Ideal Crumb-to-Butter Ratio (And Why It Works)
- Too much butter: greasy, soft crust
- Too little butter: crumbly, falls apart
Aim for: crumbs that look like damp sand—they should clump when squeezed, not drip.
How Firmly to Pack the Crust
Use this simple test:
- Press with the bottom of a measuring cup
- The surface should feel flat and firm, not fluffy
- If it springs back, press a little more
Firm packing = clean edges and easy removal.
Pre-Bake or Not? (Quick Decision Guide)
- Pre-bake (5–7 min): best for extra crispness and stability
- No pre-bake: works if you pack firmly and don’t over-butter
Both methods work—the difference is texture, not success.
Pan Prep for Easy Release
| Pan Type | What to Do | Result |
|---|---|---|
| Muffin tin | Light grease or liners | Clean release |
| Silicone cups | No prep needed | Easiest |
| Mini tart pan | Grease well | Sharp edges |
Get the crust right here, and the rest of the recipe becomes much harder to mess up.

Step-by-Step Mini Smores Pies (Base Recipe)
This is the core method for making mini smores pies that turn out gooey, balanced, and easy to serve. Follow these steps in order and you’ll get consistent results every time—no burnt tops, no unmelted chocolate, no falling-apart crust.
Step 1: Build the Crust
Start by pressing the graham cracker crust firmly into each cup of your muffin tin.
- Use about 1 tablespoon of crust per mini smores pie
- Press flat and compact so the base holds together
- Chill briefly or pre-bake if you want extra crispness
A well-packed crust is what keeps mini smores pies neat instead of crumbly.
Step 2: Add the Chocolate (Best Melt Method)
Chocolate placement matters more than people think when making mini smores pies.
- Add 1–2 squares of chocolate per pie
- Lay chocolate flat against the crust
- Avoid stacking thick pieces (they melt unevenly)
This method helps the chocolate melt into the crust, giving mini smores pies that classic gooey center.
Step 3: Top with Marshmallow
Finish each mini smores pie with marshmallow topping.
- Use mini marshmallows for even toasting
- Cover the chocolate without over-piling
- Leave tiny gaps so heat can circulate
Too many marshmallows is the fastest way to burn the tops of mini smores pies.
Step 4: Bake, Broil, or Torch (Your Choice)
Bake the mini smores pies just long enough to melt the chocolate, then choose how you want to toast the marshmallow:
| Method | Result | Best For |
|---|---|---|
| Bake only | Soft, pale top | No risk |
| Broil (briefly) | Golden top | Classic look |
| Kitchen torch | Precise browning | Total control |
Whichever method you choose, watch closely—mini smores pies go from perfect to burnt very fast.
How to Toast Marshmallows Without Burning
This is where most mini smores pies go wrong. Marshmallows don’t burn because you’re doing something “bad” — they burn because sugar reacts fast to intense heat. Once you understand that, this part becomes easy.
Why Marshmallows Burn (Simple Explanation)
Marshmallows are mostly sugar and air. When exposed to high, direct heat:
- The sugar browns quickly
- The outside burns before the inside warms
- Broilers make this happen in seconds
That’s why marshmallows can go from pale to black almost instantly on mini smores pies.
Bake vs Broil vs Torch (What Actually Works)
| Method | Result | Risk Level | Best Use |
|---|---|---|---|
| Bake only | Soft, lightly melted | Very low | Zero stress |
| Broil (short bursts) | Golden, classic look | Medium | Traditional finish |
| Kitchen torch | Even, controlled browning | Low | Maximum control |
If you’re nervous, bake only the mini smores pies and skip browning altogether — they’ll still be gooey and delicious.
The “Shield + Finish” Method (Most Reliable)
This is the safest way to get toasted tops on mini smores pies:
- Bake first until the chocolate is fully melted
- Move pies to the upper rack
- Toast briefly (or torch) just until golden
By separating melting from browning, you avoid burnt marshmallows and cold centers.
Fixes If You Over-Browned the Top
If things go too far (it happens):
- Scrape off the burnt marshmallow layer
- Add fresh marshmallows
- Re-toast gently
Mini smores pies are forgiving — you can always fix the top without starting over.
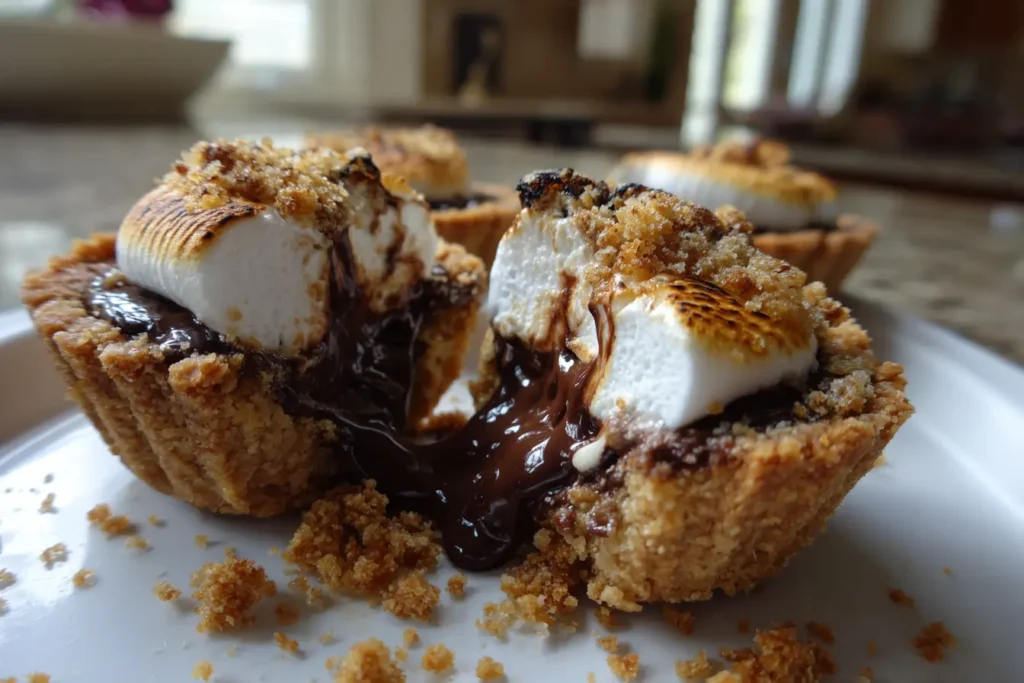
Choose Your Texture: Soft-Set, Lava, or Firm
One of my favorite things about mini smores pies is that you can control the texture without changing the recipe. The secret isn’t baking longer — it’s cooling time.
Soft-Set (Best for Kids & Easy Serving)
- Cool time: ~5–10 minutes
- Texture: Melty but holds together
- Best for: Serving right away, less mess
This is the safest option if you want mini smores pies that lift cleanly and don’t ooze everywhere.
Lava Center (Best for Photos & Wow Factor)
- Cool time: ~2–5 minutes
- Texture: Ultra-gooey chocolate pull
- Best for: Dramatic photos and fresh-from-the-oven serving
These mini smores pies are delicious but messy — perfect when you want that “wow” moment.
Firm & Sliceable (Best for Parties)
- Cool time: ~20–30 minutes
- Texture: Set chocolate, neat bite
- Best for: Sharing, transport, and clean plates
Letting mini smores pies cool longer gives the chocolate time to settle without losing flavor.
Cooling Time Cheat Sheet
| Cooling Time | Result | Mess Level |
|---|---|---|
| 2–5 minutes | Lava center | High |
| 5–10 minutes | Soft-set | Medium |
| 20–30 minutes | Firm & sliceable | Low |
If you ever feel tempted to bake longer to “fix” the texture — don’t. Cooling does the work for you.
Nutrition Information (What to Expect)
These mini smores pies are meant to be a fun, cozy treat—not a “diet” dessert. That said, it’s still helpful to know what you’re getting in each bite.
Estimated Nutrition Per Mini Smores Pie
(Based on one pie made in a standard muffin tin)
- Calories: ~170–200
- Fat: 8–10g
- Carbohydrates: 22–26g
- Sugar: 14–18g
- Protein: 2–3g
Nutrition will vary depending on chocolate type, marshmallow amount, and crust thickness.
How Ingredients Affect Nutrition
Small choices make a difference with mini smores pies:
- Chocolate bars → smoother melt, slightly higher fat
- Chocolate chips → a bit less fat, firmer texture
- More marshmallows → higher sugar, softer top
- Thicker crust → more calories, sturdier bite
Lightened-Up Options (If You Want)
If you want a slightly lighter version without sacrificing flavor:
- Use dark chocolate instead of milk
- Reduce marshmallows slightly
- Make smaller crust portions
- Serve with fresh fruit on the side
Because mini smores pies are small, portion control is built right in—and honestly, that’s part of their charm.
Variations: Air Fryer, No-Bake & Cookie Crust
Once you’ve made the base mini smores pies, these variations let you adapt the recipe to your kitchen, your time, or your cravings—without rethinking everything.
Air Fryer Mini Smores Pies
If you don’t want to turn on the oven:
- Temperature: 350°F (175°C)
- Time: 4–6 minutes
- Best pan: silicone muffin cups
Air fryer mini smores pies melt quickly, so check early. Finish with a short toast if needed.
No-Bake Mini Smores Pies
This version skips heat entirely and goes creamy instead of toasted:
- Chill the crust until firm
- Use melted chocolate or chocolate spread
- Top with marshmallow fluff
No-bake mini smores pies are softer and mousse-like—perfect for hot days.
Cookie Crust Options
Swap the graham crackers for something fun:
- Oreo crumbs: rich and chocolatey
- Chocolate graham crackers: deeper cocoa flavor
- Digestive biscuits: slightly less sweet
Pack cookie crumbs firmly; they soften faster than graham crackers in mini smores pies.
Flavor Twists (Keep It Simple)
A little goes a long way:
- Peanut butter layer under the chocolate
- Salted caramel drizzle
- Dark chocolate or mint chocolate
Stick to one twist at a time so the s’mores flavor still shines.
Frequently Asked Questions About Mini Smores Pies
How do you keep marshmallows from burning on mini smores pies?
Use gentler heat. Bake first to melt the chocolate, then toast the marshmallows briefly. High heat for too long is what burns mini smores pies.
What chocolate melts best for mini smores pies?
Chocolate bars melt the smoothest. Chocolate chips work, but they stay thicker and don’t create the same gooey center in mini smores pies.
Can I use marshmallow fluff instead of marshmallows?
Yes. Marshmallow fluff gives mini smores pies a soft, glossy top with very light browning. It won’t toast like whole marshmallows, but it’s easy and forgiving.
Can I make mini smores pies without muffin liners?
Absolutely. Lightly grease the muffin tin well and let the mini smores pies cool before removing them so the crust sets.
Can I make mini smores pies without an oven?
Yes. You can use an air fryer or make a no-bake version with melted chocolate and marshmallow fluff.
Closing Personal Note
If there’s one thing I’ve learned from making these mini smores pies over and over, it’s this: desserts don’t have to be complicated to feel special. A little chocolate, a toasty marshmallow, and a solid plan can turn an ordinary day into something cozy and memorable.
I hope these mini smores pies bring a little joy to your kitchen—maybe with a few sticky fingers, a few laughs, and definitely no burnt marshmallows this time 😉. If you make them, save the recipe, share it with someone you love, and don’t forget to enjoy the process. That’s always my favorite part.
Happy baking 🤍
for more recipes follow me in Facebook, Pinterest and medium.