Small, Funny Story for the Start
Butterfinger poke cake is one of those desserts that brings out the kid in all of us—sometimes a little too much. The first time I made one, I got so excited to poke holes that my cake ended up looking like Swiss cheese. My kids thought I’d invented a new game called “Poke-a-palooza.” Spoiler: Even with extra holes, that Butterfinger poke cake disappeared in record time. If I can pull it off (Swiss cheese look and all), you can too!
Introduction
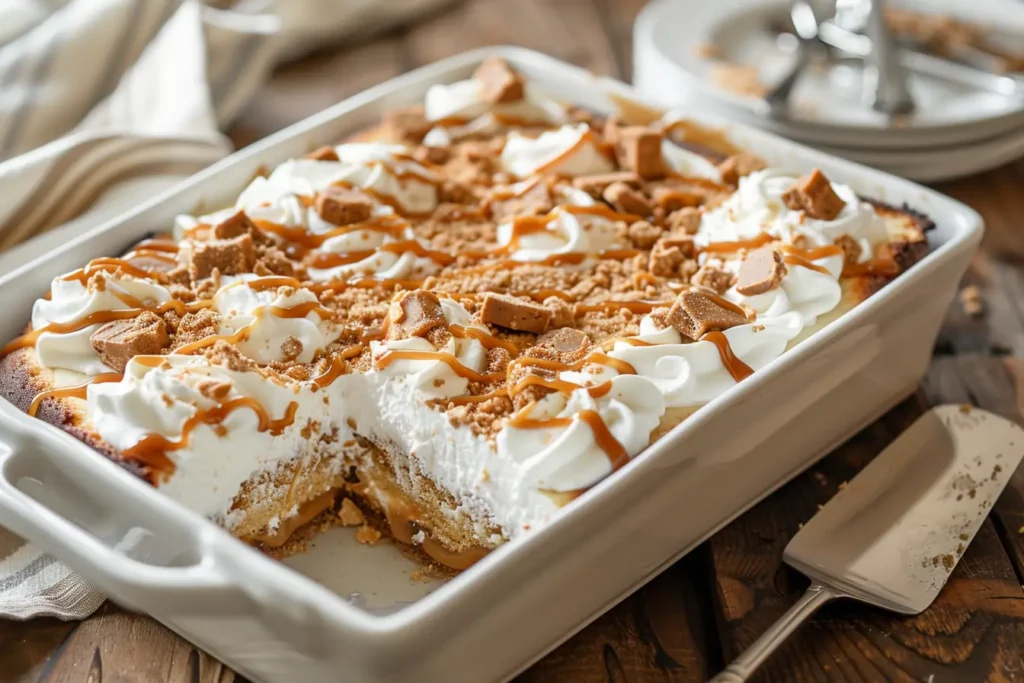
If you’re looking for a dessert that’s guaranteed to impress with minimal fuss, Butterfinger poke cake is about to become your new favorite. Imagine a moist, fluffy cake soaked with sweet pudding and caramel, then topped with a mountain of crushed Butterfinger bars for that perfect chocolatey, crunchy finish. This is the kind of treat that brings everyone to the kitchen—whether they’re drawn by the delicious smell or the promise of a second helping.
Love easy and crowd-pleasing desserts? You might also enjoy my Pecan Pie Dump Cake for another effortless, party-worthy treat, or try these Vanishing Oatmeal Cookies when you’re craving something cozy.
In this ultimate guide, you’ll get step-by-step instructions, pro tips for perfect results, creative ways to customize your poke cake, storage and serving secrets, and even nutrition info. Whether you’re baking for a birthday, a potluck, or just because it’s a Tuesday and you deserve it, you’ll find everything you need to make this Butterfinger poke cake a smashing success.
Ready to bake up some chocolatey joy? Let’s get started!
Table of Contents
Table of Contents
What is Butterfinger Poke Cake?
Butterfinger poke cake is a fun, crowd-favorite treat that brings together sweet nostalgia and pure decadence in every bite. At its core, it’s a moist cake—usually baked from a boxed mix or from scratch—poked all over with the handle of a wooden spoon (yes, really!) so it can absorb a delicious layer of creamy pudding or rich caramel. The grand finale? A hearty handful of crushed Butterfinger bars on top adds that classic chocolate and peanut butter crunch, making each bite truly memorable.
What makes poke cake special is how it soaks up all the flavors and stays deliciously moist from the inside out. This dessert has its roots in American home baking, where “poke” cakes became popular for their simple method and endless variations. Whether you’re making it for a birthday party, a potluck, or a last-minute weeknight treat, Butterfinger poke cake is a guaranteed showstopper.
If you’re a fan of easy, make-ahead desserts that get people talking (and asking for seconds), you’re going to love this recipe. Plus, you can customize it to fit almost any occasion or craving!
Ingredients & Tools
Print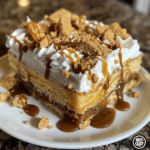
Butterfinger Poke Cake
- Total Time: 1 hour 50 minutes (includes chilling)
- Yield: 15 servings 1x
- Diet: Vegetarian
Description
This Butterfinger poke cake is an easy, irresistible dessert with layers of moist cake, creamy pudding, caramel, and plenty of crunchy Butterfinger candy bars. Perfect for parties, birthdays, or any sweet craving!
Ingredients
-
1 box yellow cake mix (plus eggs, oil, and water per package)
-
1 can (14 oz) sweetened condensed milk
-
1 jar (12 oz) caramel sauce
-
1 package (3.4 oz) instant vanilla or butterscotch pudding mix
-
2 cups cold milk (for pudding)
-
1 container (8 oz) whipped topping (thawed)
-
4–5 Butterfinger bars, crushed
Optional:
-
Chocolate cake mix for variation
-
Sugar-free pudding or light whipped topping for a lighter version
-
Extra caramel sauce for drizzling
Instructions
-
Preheat oven to 350°F (175°C). Prepare and bake the cake mix in a 9×13-inch pan according to package directions. Let cool for 10–15 minutes.
-
Using the handle of a wooden spoon, poke holes all over the cake about 1 inch apart.
-
Pour the sweetened condensed milk evenly over the cake, letting it soak into the holes.
-
Drizzle the caramel sauce over the cake, spreading it gently.
-
In a bowl, whisk the pudding mix with cold milk until thickened, then spread it over the cake, pressing gently to fill the holes.
-
Refrigerate for at least 1 hour to let everything set.
-
Spread whipped topping evenly over the chilled cake.
-
Top with crushed Butterfinger bars and drizzle with extra caramel if desired.
-
Cut, serve chilled, and enjoy!
Notes
-
For the crunchiest topping, add crushed Butterfinger bars just before serving.
-
This cake is best chilled and tastes even better the next day.
-
Make it gluten-free by using gluten-free cake mix and checking all ingredient labels.
-
You can freeze leftover slices wrapped tightly in plastic wrap.
- Prep Time: 20 minutes
- Cook Time: 30 minutes
- Category: Dessert
- Method: Baking
- Cuisine: American
Nutrition
- Serving Size: 1 slice (1/15 of cake)
- Calories: 370
- Sugar: 41g
- Sodium: 280mg
- Fat: 15g
- Saturated Fat: 7g
- Unsaturated Fat: 6g
- Trans Fat: 0g
- Carbohydrates: 55g
- Fiber: 1g
- Protein: 4g
- Cholesterol: 45mg
Before you start baking your Butterfinger poke cake, let’s make sure you have everything you need for a no-stress kitchen experience. Good news: this recipe uses simple, easy-to-find ingredients and basic tools—nothing fancy required!
Ingredients
- 1 box yellow cake mix, prepared with the eggs, oil, and water listed on the package
Swap with chocolate or devil’s food cake mix for a richer flavor! - 1 can (14 oz) sweetened condensed milk
- 1 jar (12 oz) caramel sauce
- 1 package (3.4 oz) instant vanilla or butterscotch pudding mix
- 2 cups cold milk (for the pudding)
- 1 container (8 oz) whipped topping, such as Cool Whip, thawed before use
- 4–5 Butterfinger bars, crushed
(For a gluten-free version, check candy ingredients or substitute with gluten-free toffee bars.)
Optional Add-Ins:
- Chocolate chips, a drizzle of extra caramel, or a pinch of sea salt for an added touch.
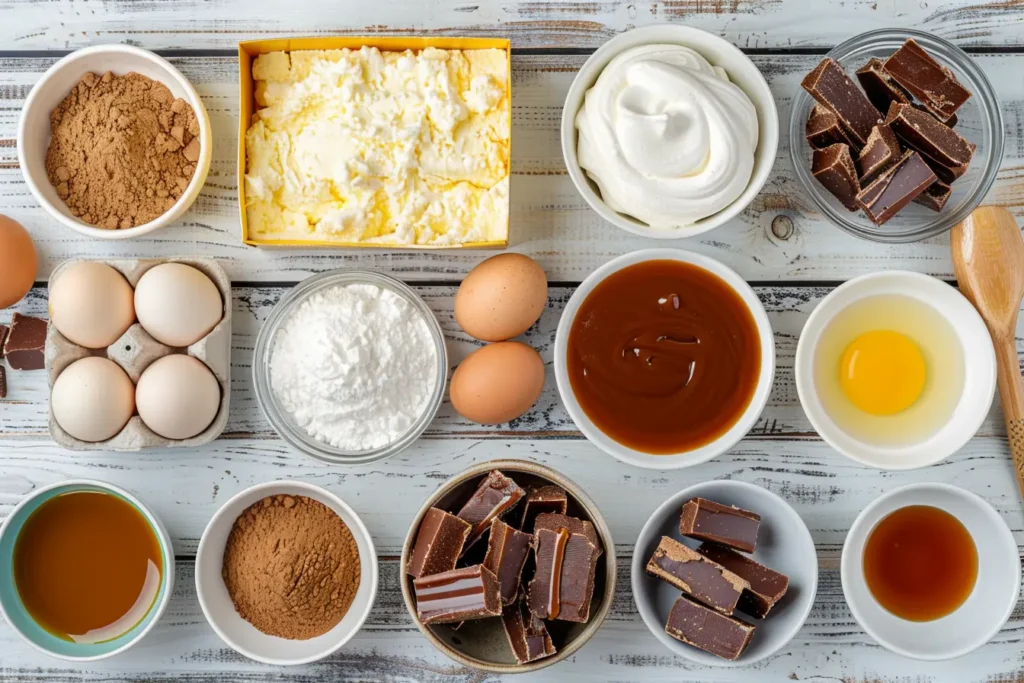
Tools
- 9×13-inch baking pan
- Mixing bowls and whisk
- Electric mixer (helpful but not required)
- Wooden spoon (for poking!)
- Offset spatula or a regular spoon for spreading layers
- Measuring cups and spoons
- Plastic wrap or airtight container (for storage)
Tip: Pre-crush your Butterfinger bars by popping them in a zip-top bag and giving them a gentle whack with a rolling pin. It’s oddly satisfying!
Step-by-Step Butterfinger Poke Cake Recipe
Let’s turn those simple ingredients into pure dessert magic! Follow these steps and you’ll have a Butterfinger poke cake that’s ooey-gooey, perfectly moist, and topped with that signature crunchy finish.
Bake the Cake
- Preheat your oven to 350°F (175°C).
- Prepare the cake mix according to the box directions, using a 9×13-inch pan.
- Bake for 25–30 minutes, or until a toothpick inserted into the center of the cake comes out clean.
- Cool for 10–15 minutes. (Don’t skip this step—the cake needs to be warm but not piping hot for the next part.)
Poke and Soak
- Grab the handle of a wooden spoon (or a similar tool) and poke holes all over the cake, spacing them about 1 inch apart.
Don’t worry if it looks like Swiss cheese—that’s how the flavor gets in! - Pour the sweetened condensed milk evenly over the warm cake, letting it soak into the holes.
- Drizzle caramel sauce over the top, spreading gently with a spatula if needed.
Pudding Layer
- Prepare the instant pudding by whisking the mix with cold milk for 2 minutes, until it starts to thicken.
- Evenly spread the pudding over the cake, gently pressing to ensure it seeps into all the holes and crevices.
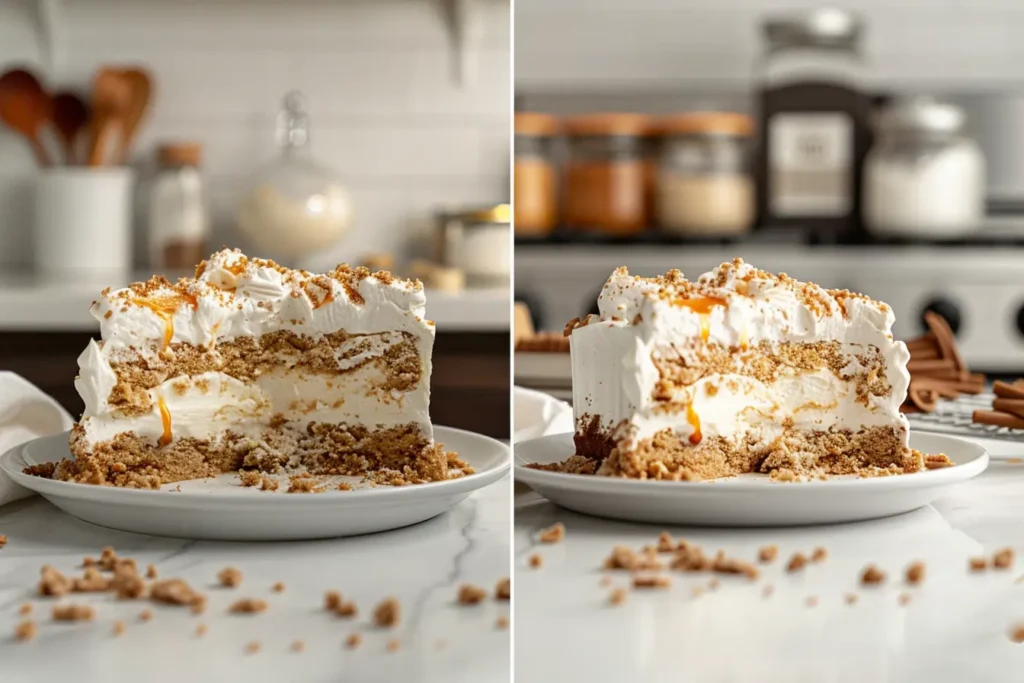
- Chill the cake in the fridge for at least 1 hour to set the layers (longer is even better).
Topping Time
- Spread the whipped topping (Cool Whip) evenly over the chilled pudding layer.
- Sprinkle generously with crushed Butterfinger bars.
Tip: Crush them just before using for the crunchiest texture! - Add an extra drizzle of caramel sauce or sprinkle some chocolate chips on top for a special touch.
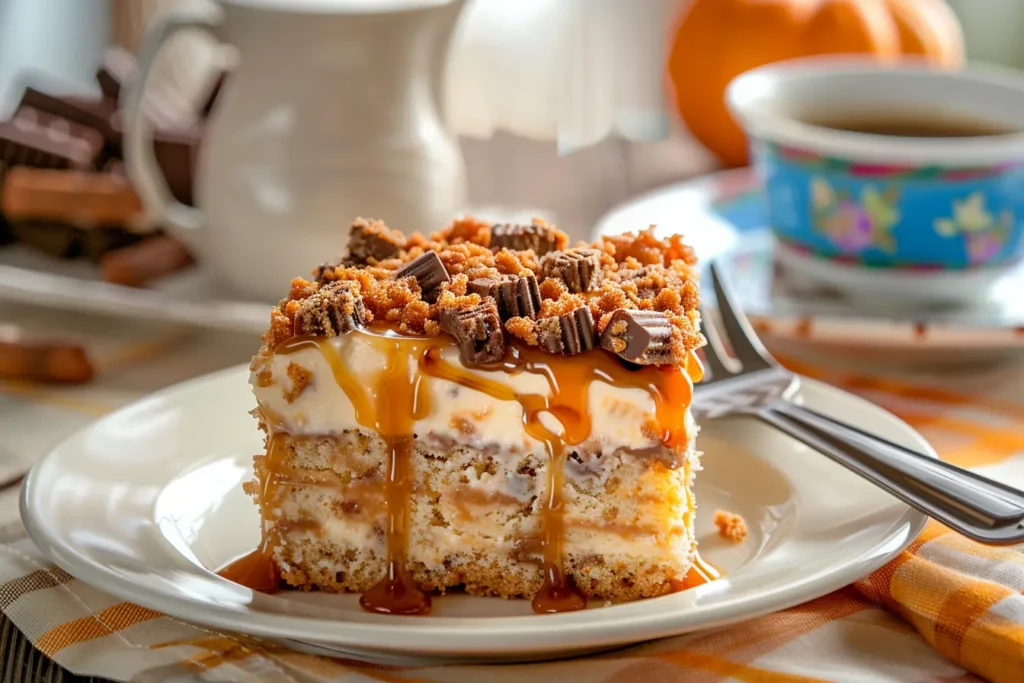
Slice, Serve, and Savor
- Cut into squares, serve chilled, and watch it disappear!
- For a party-ready look, add a little extra Butterfinger or a drizzle of caramel on each slice.
Pro tip: This cake tastes even better the next day after the flavors have had time to meld together. Store leftovers in the fridge and enjoy within 3–4 days.
Nutrition Details
Curious about what’s in a slice of Butterfinger poke cake? Here’s an estimated nutrition breakdown, based on a 9×13-inch pan cut into 15 servings. Numbers may vary depending on your chosen brands and ingredient swaps:
| Nutrient | Per Serving (approximate) |
|---|---|
| Calories | 370 |
| Total Fat | 15g |
| Saturated Fat | 7g |
| Carbohydrates | 55g |
| Sugar | 41g |
| Protein | 4g |
| Sodium | 280mg |
Allergen Alert: This dessert contains wheat (gluten), milk, peanuts (from Butterfinger bars), and eggs. Always check your cake mix, pudding, and candy bar labels for the most up-to-date allergen information, especially if you’re baking for someone with food sensitivities.
Looking for Lighter or Allergy-Friendly Options?
- Lower the fat: Use light whipped topping and substitute reduced-fat or skim milk in your pudding layer.
- Cut the sugar: Opt for sugar-free pudding or a lighter cake mix.
- Make it gluten-free: Choose a certified gluten-free cake mix and verify your candy bar is gluten-free (always double-check!).
- More smart baking swaps: Check out the American Heart Association’s healthy baking substitutions for easy, creative ways to lighten up your treats.
Butterfinger poke cake is the ultimate treat-yourself dessert—rich, sweet, and perfect for sharing. Don’t hesitate to make it your own with the swaps that suit your needs!
Pro Tips & Troubleshooting
Want your Butterfinger poke cake to come out perfect every single time? Here are my best pro tips, plus solutions to the most common poke cake problems—so you can bake with total confidence!
Top Tips for Butterfinger Poke Cake Success
- Cool but not cold: Let your Butterfinger poke cake cool for about 10–15 minutes before poking holes. If it’s too hot, the cake might get mushy; too cold, and it won’t soak up the pudding or caramel as well.
- Even pokes: Use the handle of a wooden spoon to create holes about an inch apart—this helps the cake absorb all that creamy goodness evenly.
- Don’t skimp on the sauce: Make sure to pour the sweetened condensed milk and caramel sauce slowly, letting it seep into every nook and cranny of your Butterfinger poke cake.
- Chill for best results: Pop your Butterfinger poke cake in the fridge for at least an hour (longer if you can!). This sets the layers, melds the flavors, and makes it easier to cut clean squares.
Common Butterfinger Poke Cake Mistakes & How to Fix Them
- Cake too soggy: You may have poked too many holes or added the liquid when the cake was too hot. Next time, let the cake cool slightly and poke with care.
- Pudding too runny: Be sure to use instant pudding mix with cold milk, and give it a couple of minutes to thicken before spreading over your poke cake.
- Topping not crunchy: Add crushed Butterfinger bars just before serving to keep that iconic crunch.
Extra Butterfinger Poke Cake Hacks
- Make ahead: Butterfinger poke cake tastes even better the next day! It’s the perfect party dessert because you can make it the night before.
- Freezer friendly: You can freeze Butterfinger poke cake slices—just wrap them tightly. Thaw overnight in the fridge and enjoy.
- Allergy-friendly swaps: Use gluten-free cake mix or dairy-free pudding if needed. (Always double-check your candy for hidden allergens.)
No matter what, this Butterfinger poke cake is forgiving, fun, and always a hit. If you’ve had a poke cake fail before, don’t worry—these tips will have you back on the sweet, crunchy track!
Customizations & Variations
One of the greatest things about Butterfinger poke cake is how simple it is to customize to your own taste! Whether you’re serving a crowd, dealing with allergies, or just love experimenting, here are some delicious ways to put your personal spin on this crowd-pleasing dessert.
Candy Bar Swaps
- Don’t have Butterfinger bars? Try swapping in Snickers, Milky Way, or Heath bars for a different flavor twist.
- For a peanut-free option, use toffee bits or mini chocolate chips instead of Butterfinger.
Cake Mix Fun
- You don’t have to stick to yellow cake—chocolate, devil’s food, or even spice cake mix all work beautifully with Butterfinger poke cake.
- For a super-rich dessert, use chocolate cake and add a drizzle of hot fudge over the top.
Allergy-Friendly Butterfinger Poke Cake
- Make it gluten-free by using your preferred certified gluten-free cake mix.
- For a dairy-free version, use almond or oat milk to prepare the pudding and opt for coconut whipped topping.
- Be sure to check the labels on your candy bars for any allergen information—some mini versions may be gluten-free, but it’s best to confirm before using.
Party & Holiday Variations
- Turn your Butterfinger poke cake into cupcakes for simple, crowd-friendly desserts at birthdays or potlucks.
- Layer your Butterfinger poke cake in jars for a trendy dessert-on-the-go.
- Decorate the top with seasonal sprinkles, extra caramel drizzle, or even a dollop of whipped cream for special occasions.
The possibilities are endless! The only rule: don’t skimp on the Butterfinger crunch. Try a new twist every time you bake, and you’ll never get bored with this irresistible dessert.
Serving, Storage & Leftovers
You’ve made your Butterfinger poke cake—now let’s make sure every slice is as dreamy as the first! Here’s how to serve, store, and enjoy those sweet leftovers safely and deliciously.
How to Serve Butterfinger Poke Cake
- To get neat, bakery-style slices, cut the cake with a sharp knife that’s been dipped in hot water and wiped clean after each slice.
- Want a show-stopping finish? Add an extra sprinkle of crushed Butterfinger or a drizzle of caramel sauce on each serving.
- Butterfinger poke cake is best served chilled straight from the fridge—perfect for hot days or party buffets!
Storing Butterfinger Poke Cake
- Keep your Butterfinger poke cake fresh by covering it snugly with plastic wrap or storing it in an airtight container.
- Because this cake has pudding and whipped topping, it needs to be refrigerated. According to the FDA’s food storage guidelines, cakes with dairy should be kept in the fridge and enjoyed within 3–4 days.
- Wondering about room temperature? The USDA recommends that cakes with dairy-based fillings or frostings (like pudding or whipped cream) should not sit out for more than 1–2 hours.
What About Leftovers?
- Butterfinger poke cake actually gets better as it sits—flavors meld, and it stays extra moist!
- If you have lots left, you can freeze individual slices by wrapping them tightly in plastic wrap and foil. Thaw overnight in the fridge before serving.
- Pro tip: Leftover Butterfinger poke cake makes an amazing sundae topping—just chop it up and serve over vanilla ice cream!
Keep these tips handy, and you’ll never waste a crumb. Safe storage means your Butterfinger poke cake will be a hit from the first slice to the last!
Frequently Asked Questions (FAQ’s)
What’s the best cake mix for Butterfinger poke cake?
You can use yellow, chocolate, or devil’s food cake mix—whatever you prefer! Yellow cake is classic, but chocolate makes it extra decadent.
Can I make Butterfinger poke cake gluten-free?
Absolutely! Just swap in your favorite certified gluten-free cake mix and double-check all your candy and pudding labels for hidden gluten.
How long can I store Butterfinger poke cake in the fridge?
According to FDA food safety guidelines, cakes with dairy (like pudding and whipped topping) should be kept in the fridge and eaten within 3–4 days for best quality.
Can I freeze Butterfinger poke cake?
Yes! Slice and wrap individual pieces tightly, then freeze for up to a month. Thaw in the fridge overnight before serving.
Can I use homemade pudding instead of instant pudding?
Definitely! Just be sure your homemade pudding is thick enough to sit on top of the cake and fill the holes.
Conclusion & Next Steps
You did it—now you’re ready to make Butterfinger poke cake like a pro! This dessert is all about maximum flavor with minimum fuss, so don’t be surprised if it becomes your new go-to for parties, family get-togethers, or anytime you need a sweet pick-me-up. If you’re on the hunt for more deliciously easy treats, be sure to check out my Pecan Pie Dump Cake, Amish Applesauce Cake, or some chewy Vanishing Oatmeal Cookies for your next baking adventure.
Now it’s your turn! Print or save the recipe, gather your ingredients, and get baking. I’d love to hear how your Butterfinger poke cake turns out—drop a comment below or tag your dessert photos on social media. And if you want even more sweet inspiration,for more recipes follow me in Facebook, Pinterest and medium.