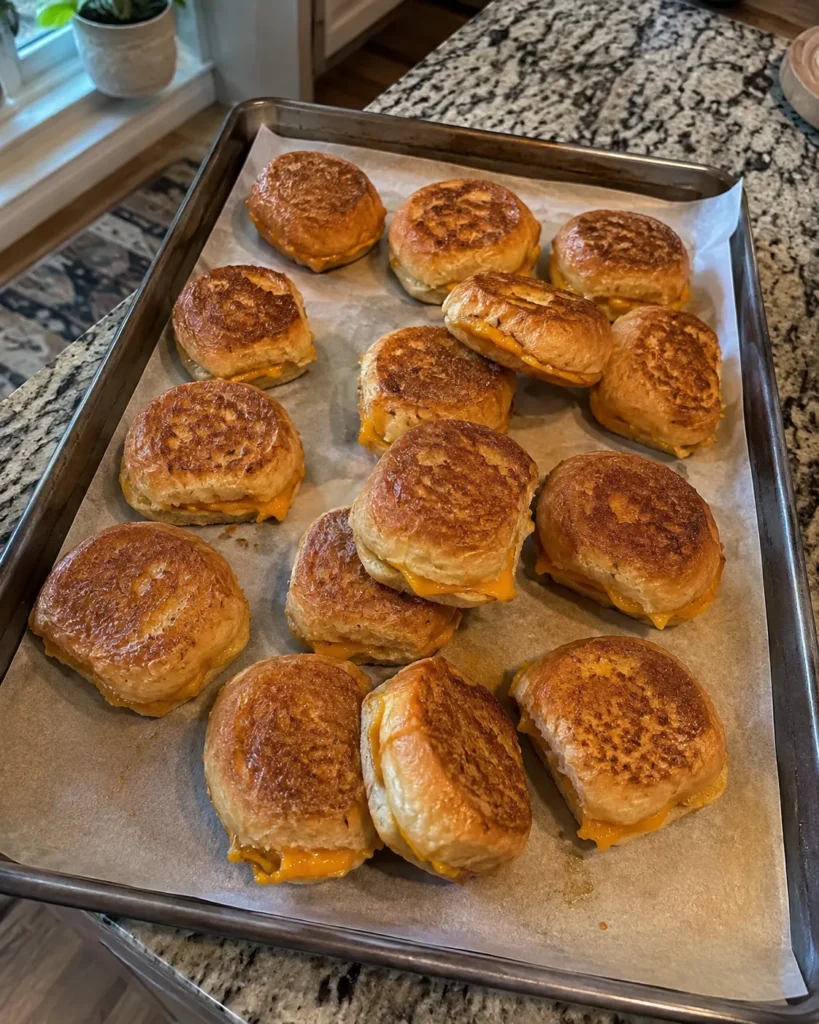
Some lunches take five minutes to make and disappear from the lunchbox even faster — this mini grilled cheese for school recipe is exactly that kind of win. Buttery golden rolls, a layer of melty cheddar, and a quick trip to the oven turn an ordinary school-day sandwich into something kids actually ask for again. It’s simple enough for a Tuesday morning and sturdy enough to make ahead for the whole week.
These little sandwiches are perfect any time you need lunchbox food that travels well, reheats easily, and doesn’t require standing over a hot stove flipping sandwich after sandwich. Serve them warm, at room temperature, or straight from the freezer for an instant lunch upgrade.
Save this one for busy mornings when you need something simple, cozy, and family-friendly.
Quick Recipe Snapshot
- Prep time: 15 minutes
- Cook time: 12–15 minutes
- Total time: about 30 minutes
- Servings: 12 mini sandwiches (about 4–6 lunchbox portions)
- Difficulty: Beginner-friendly
- Best for: School lunches, after-school snacks, meal prep
- Main method: Oven sheet-pan bake
- Flavor profile: Buttery, cheesy, mildly savory
Table of Contents
Why You’ll Love This Mini Grilled Cheese for School
- One batch makes enough for several lunches, so you only cook once
- The small size means less mess and easier bites for younger kids
- It’s freezer-friendly, so busy mornings are already covered
- It uses just a handful of pantry staples
- Picky eaters tend to love the soft roll and melty cheese combo
What Makes This Mini Grilled Cheese Work
Baking a whole batch on a sheet pan instead of frying sandwiches one at a time on the stove means the bread toasts evenly and the cheese melts at the same rate in every sandwich. Soft dinner rolls hold their shape well after cooling, so this mini grilled cheese for school version slices cleanly into lunchbox-sized pieces without falling apart. Butter on both cut sides gives that golden, slightly crisp edge people expect from grilled cheese, even though nothing touches a skillet.
Ingredients You’ll Need
- Soft dinner rolls (12-count): Hawaiian sweet rolls or slider buns work great — their size is already close to lunchbox-perfect.
- Sliced or shredded mild cheddar: Melts smoothly and has a flavor most kids already like. For more on why some cheeses melt better than others, the Institute of Culinary Education has a helpful breakdown of the best cheeses for grilled cheese.
- Unsalted butter, softened: Coats both cut sides of the rolls for that classic golden crust.
- Garlic powder and Italian seasoning (optional): A light touch of flavor most kids barely notice but adults appreciate.
Ingredient Notes and Easy Swaps
- No Hawaiian rolls on hand? Any soft slider bun or dinner roll works — just look for something close to 2–3 inches wide.
- Cheddar can be swapped for mozzarella, colby jack, or a blend, depending on what melts well and what your kids already eat.
- Skip the seasoning entirely for picky eaters — it’s optional, not essential, in this mini grilled cheese for school recipe.
- Don’t swap the butter for oil. Butter is what gives the golden color and classic grilled cheese flavor.
How to Make Mini Grilled Cheese for School
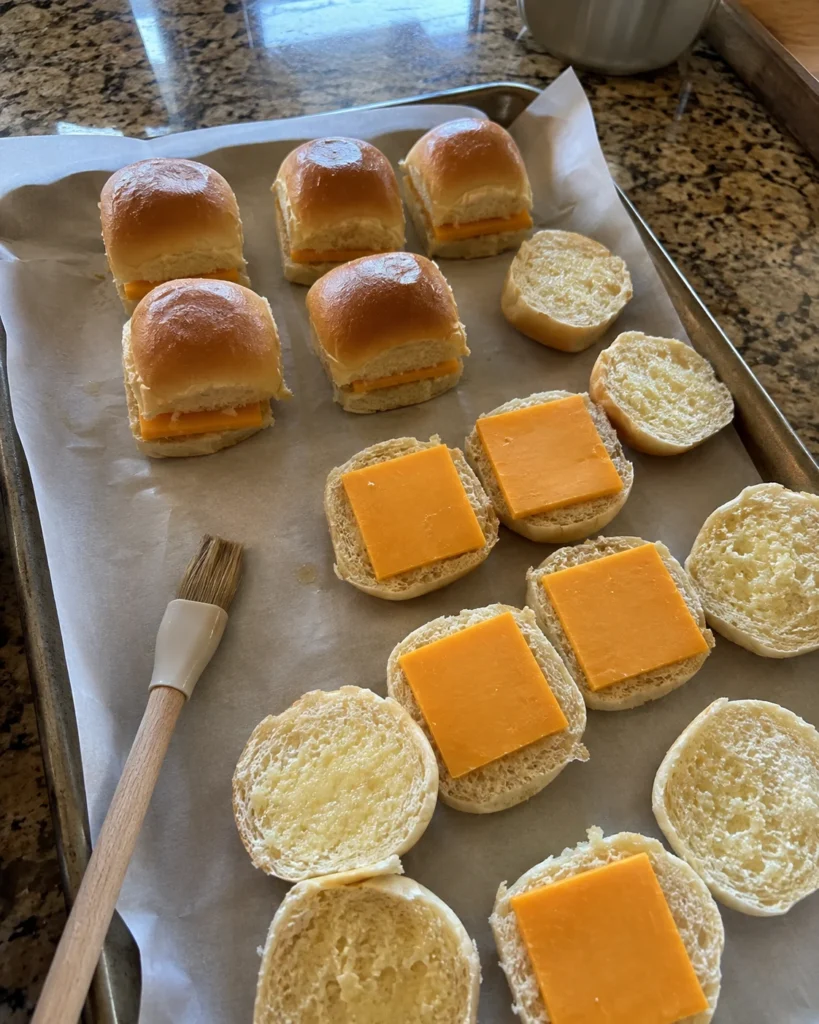
- Preheat the oven to 350°F. Line a baking sheet with parchment paper for easy cleanup.
- Slice the rolls in half horizontally, keeping connected rolls together if you like, or separating them into individual pieces first.
- Butter both cut sides of the rolls generously. If using the garlic-herb butter, mix softened butter with garlic powder and Italian seasoning first.
- Layer the cheese. Place a slice or a small handful of shredded cheddar on the bottom half of each roll.
- Top and press. Add the top half of each roll and press down gently so the sandwich holds together.
- Bake for 10–12 minutes, until the tops are lightly golden and the cheese has started to melt at the edges.
- Flip carefully with a spatula, then bake another 3–5 minutes until both sides are golden and the cheese is fully melted and glossy.
- Cool for 5 minutes before slicing into individual sandwiches — this keeps the melted cheese from spilling out.
You’ll know they’re ready when the tops turn a deep golden color and you can see the cheese just starting to bubble at the seams.
Beginner Tips for Best Results
- Slice through the rolls with a serrated knife for the cleanest cut without squishing the bread.
- Let the sandwiches cool for a few minutes before cutting — hot melted cheese is messy and can burn little fingers.
- Use freshly shredded cheese instead of pre-shredded bags for smoother melting.
- If your rolls are stuck together, cutting the whole sheet in half at once is easier than separating each roll first.
Common Mistakes to Avoid
- Skipping the flip: Baking on one side only leaves the bottoms soft instead of golden. Flip halfway through for even color.
- Overfilling with cheese: Too much cheese leaks out and burns on the pan. A single slice or light handful per roll is plenty.
- Cutting too soon: Slicing right out of the oven means melted cheese spills everywhere. A short rest fixes this.
- Using cold butter: Cold butter tears the soft rolls instead of spreading smoothly. Let it soften at room temperature first.
Easy Variations
- Spicier: Add a thin layer of diced pickled jalapeños for kids who like a little heat.
- Extra creamy: Mix mozzarella with the cheddar for a stretchier, gooier bite.
- Holiday version: Swap in a festive cheese blend and cut sandwiches into fun shapes with a small cookie cutter.
- Kid-approved classic: Keep it to just butter and cheese, no seasoning, for the pickiest eaters.
- Craving a grown-up twist on the same idea? Our bacon jam grilled cheese and crispy blueberry grilled cheese use the same melty-cheese logic in bigger, bolder flavors, and our grilled cheese hot dogs are a fun mash-up worth trying for dinner.
What to Serve With Mini Grilled Cheese for School
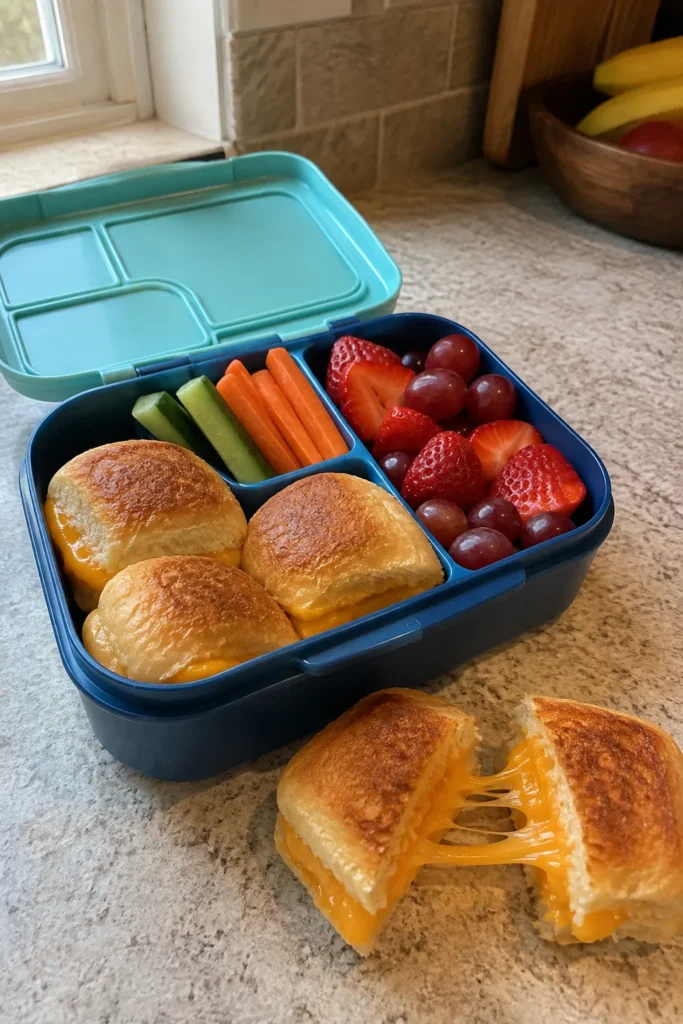
A cup of tomato soup is the classic pairing, but for a packed lunch, try rounding things out with fresh fruit, veggie sticks, or a handful of crackers. If you’re planning a whole week of lunches, our chicken and cheese lunchbox muffins and fruit quesadillas pair well for variety, and pizza crunchers or dino nuggets with volcano ketchup make great backup options for days when even mini grilled cheese needs a break.
Make-Ahead Tips
Assemble the sandwiches up to a day ahead and store them, unbaked, covered in the fridge — then bake fresh the morning you need them. You can also bake the full batch ahead of time and simply reheat individual portions as needed through the week, which makes this mini grilled cheese for school recipe genuinely meal-prep friendly.
How to Store Mini Grilled Cheese for School
Once cooled, store leftover sandwiches in an airtight container in the refrigerator for up to 3 days. Keep parchment or wax paper between layers so they don’t stick together.
Can You Freeze Mini Grilled Cheese for School?
Yes — this recipe freezes well, which is part of what makes it such a solid school-lunch option. Let the sandwiches cool completely, then freeze them in a single layer on a baking sheet before transferring to a freezer bag. For the best texture and flavor, use them within 2–3 months.
How to Reheat
For the crispiest results, reheat in the oven or toaster oven at 350°F for about 8–10 minutes from frozen, or 5 minutes from the fridge. The microwave works in a pinch, in 30-second increments, but the bread will be softer instead of crisp.
If sandwiches are headed into a lunchbox instead of being eaten right away, pack them alongside a frozen gel pack or frozen juice box to keep everything at a safe temperature until lunchtime. USDA’s back-to-school lunchbox guidelines have more detail on packing perishable foods like this one safely.
Nutrition Notes
These mini sandwiches offer a comforting mix of carbohydrates, protein, and calcium from the cheese, plus a bit of fat from the butter. Exact nutrition will vary depending on the type of roll, cheese, and butter you use, so treat any nutrition estimate as a general guide rather than an exact number. For general storage guidance on dairy-based foods like this one, FoodSafety.gov’s cold food storage chart is a useful reference.
Frequently Asked Questions
Can I make mini grilled cheese for school ahead of time?
Yes. Assemble and refrigerate unbaked sandwiches up to a day ahead, or bake the full batch in advance and reheat individual portions through the week.
What’s the best bread for mini grilled cheese?
Soft dinner rolls or slider buns work best because their size is already close to lunchbox-portioned, and they hold together well after baking and cooling.
Is mini grilled cheese safe to pack in a lunchbox?
Yes, as long as it’s kept cold with an ice pack or frozen drink in an insulated lunch bag, since it contains dairy and shouldn’t sit at room temperature for more than about 2 hours.
Can I use a different cheese?
Absolutely. Cheddar is classic, but mozzarella, colby jack, or a blend all melt well in this recipe.
How many mini grilled cheese sandwiches per lunchbox?
Most kids do well with 2–3 mini sandwiches per lunch, depending on age and appetite.
Can this recipe be doubled?
Yes — simply use two baking sheets or bake in batches so the sandwiches aren’t crowded on the pan.
Do I have to use the garlic-herb butter?
No, it’s completely optional. Plain buttered rolls and cheese work just as well for picky eaters.
Final Thoughts
This mini grilled cheese for school recipe is proof that lunchbox food doesn’t need to be complicated to be genuinely good. One sheet pan, a few pantry staples, and about 30 minutes gets you a batch that covers several lunches ahead. Give it a try this week and see how quickly it becomes a regular in your rotation.
Print
Mini Grilled Cheese for School
- Total Time: 30 minutes
- Yield: 12 mini sandwiches 1x
- Diet: Vegetarian
Description
Golden, buttery mini grilled cheese sandwiches made with soft dinner rolls and melty cheddar — baked in one batch and perfect for packing into school lunchboxes all week.
Ingredients
1 package (12-count) soft dinner rolls or Hawaiian sweet rolls
8 to 10 slices mild cheddar cheese (or 1 1/2 cups shredded)
4 tablespoons unsalted butter, softened
1/2 teaspoon garlic powder (optional)
1 teaspoon Italian seasoning (optional)
Instructions
1. Preheat oven to 350°F and line a baking sheet with parchment paper.
2. Slice rolls in half horizontally.
3. Mix softened butter with garlic powder and Italian seasoning, if using. Butter both cut sides of the rolls.
4. Place cheese on the bottom half of each roll, then top with the other half and press gently.
5. Bake 10 to 12 minutes, flip, then bake another 3 to 5 minutes until golden and melted.
6. Cool 5 minutes before slicing into individual sandwiches.
Notes
For a picky-eater version, skip the garlic powder and Italian seasoning entirely.
Freezes well for up to 2 to 3 months.
Store leftovers in an airtight container in the fridge for up to 3 days.
- Prep Time: 15 minutes
- Cook Time: 15 minutes
- Category: Lunch
- Method: Baking
- Cuisine: American
Nutrition
- Serving Size: 1 sandwich
- Calories: 145 kcal
- Sugar: 3g
- Sodium: 220mg
- Fat: 8g
- Saturated Fat: 4.5g
- Unsaturated Fat: 3g
- Trans Fat: 0.1g
- Carbohydrates: 13g
- Fiber: 1g
- Protein: 6g
- Cholesterol: 20mg
Print and Save This Mini Grilled Cheese
If mini grilled cheese for school is going into your regular lunch rotation, print this recipe or save it so it’s easy to find again on a busy morning.