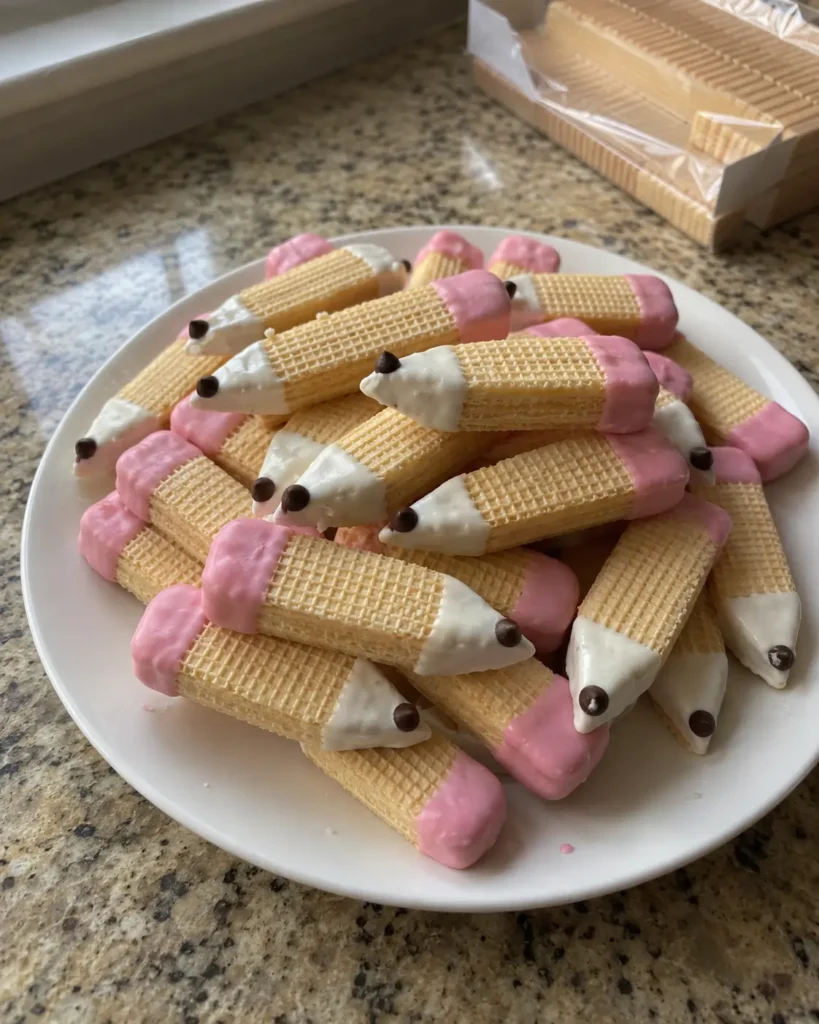
Sugar Wafer Pencil Cookies are the kind of treat that turns a regular Tuesday in August into a small event. You start with a box of store-bought sugar wafers, trim one end into a point, and dip both ends in melted candy coating. Twenty minutes later, you have a tray of edible pencils that look like they took real effort.
There’s no oven, no dough, and no batter to chill overnight. That matters in late summer, when the school supply list is still half-finished and nobody has the energy for a genuine baking project.
These were made for classroom parties, teacher gift bags, lunchbox surprises, and the kind of after-school snack that gets an actual reaction. Save this one for busy days when you need something simple, cozy, and family-friendly.
Quick Recipe Snapshot – Sugar Wafer Pencil Cookies
- Prep time: 20 minutes
- Cook time: 0 minutes (no baking)
- Setting time: 30 minutes
- Total time: 50 minutes
- Servings: 24 cookies
- Difficulty level: Easy — genuinely beginner-friendly
- Best for: Back to school, classroom parties, teacher gifts, lunchboxes
- Main method: No-bake, cut and dip
- Flavor profile: Sweet, crisp, creamy, vanilla
Table of Contents
Table of Contents
Why You’ll Love These Sugar Wafer Pencil Cookies
- Four ingredients, and three of them are already sweet. Nothing here needs measuring by weight.
- Zero baking. No oven heating up your kitchen in August.
- Kids can do most of it. An adult handles the knife; everyone else dips and places chips.
- They look harder than they are. This is the whole appeal, and nobody has to know.
- They travel well. Firm candy coating means a tray that survives the drive to school.
- Twenty-four at a time. That’s a standard classroom, no math required.
If you’ve made no-bake treats before, these fall into the same easy category as no-bake avalanche cookies — big payoff, almost no technique.
What Makes These Sugar Wafer Pencil Cookies Work
The genius here isn’t the recipe. It’s the shape of a sugar wafer.
A sugar wafer is already a long, thin rectangle with squared-off ends — which is to say, it’s already 80% of a pencil. Trim one end into a triangle and your brain fills in the rest immediately. You aren’t sculpting anything.
The candy coating does two jobs at once. It supplies the color that sells the illusion, and it hardens into a firm shell that holds the mini chocolate chip in place as the “lead.” Melted chocolate chips would stay soft and smudge; candy melts set hard at room temperature and stay put.
And the cream filling inside the wafer stays crisp because nothing wet ever touches it. That’s why this works where a frosted version doesn’t.
Ingredients You’ll Need for these Sugar Wafer Pencil Cookies
24 vanilla creme sugar wafer cookies. The base. Buy one extra box — a few will crumble while you’re finding your rhythm with the knife, and that’s normal, not a failure.
½ cup white candy melts. This forms the sharpened tip. Candy melts are a confectionery coating, not real chocolate, which means no tempering and a firm set at room temperature. Here’s Wilton’s guide to melting them properly if you’ve never used them.
½ cup pink candy melts. The eraser. Buying pink is easier than tinting white.
24 mini chocolate chips. The pencil lead. Mini, not standard — a full-size chip is comically large on a wafer.
A note on the ½ cup: you’ll have some left over, and that’s on purpose. You cannot dip into a shallow puddle. Use a narrow container so the coating pools deep enough to actually cover the tip in one motion.
Ingredient Notes and Easy Swaps – Sugar Wafer Pencil Cookies
Wafer flavor: Chocolate or strawberry wafers work fine and look great — the pink eraser especially pops against a chocolate wafer.
Gluten-free: Gluten-free wafer cookies are widely available now and behave identically.
The lead: Chocolate jimmies instead of a mini chip. Dip the wet tip straight into a small bowl of them.
Tinting your own pink: If you can only find white melts, tint them — but use gel or oil-based food coloring only. This is the one swap that can ruin your batch, and it’s covered below.
Don’t swap the candy melts for regular chocolate chips if you can help it. They melt thicker, coat unevenly, and stay soft enough to smudge in a warm room.
How to Make Sugar Wafer Pencil Cookies
Work in batches by color. Do every cut first, then one color all the way through, then the other. Switching back and forth is how melted coating stiffens up on you.
- Line a baking sheet with parchment paper. This is where the cookies will set, and it makes cleanup enormously easier.
- Cut all 24 tips first. Using a sharp serrated knife, score lightly along the angle first, then complete the cut — two diagonal cuts from one end, meeting at a point. A dull knife crushes the wafer instead of slicing it. Brush the crumbs away before dipping.
- Melt the pink candy melts. Microwave at 50% power in 30-second bursts, stirring between each. Stop when it’s smooth and about the consistency of pudding.
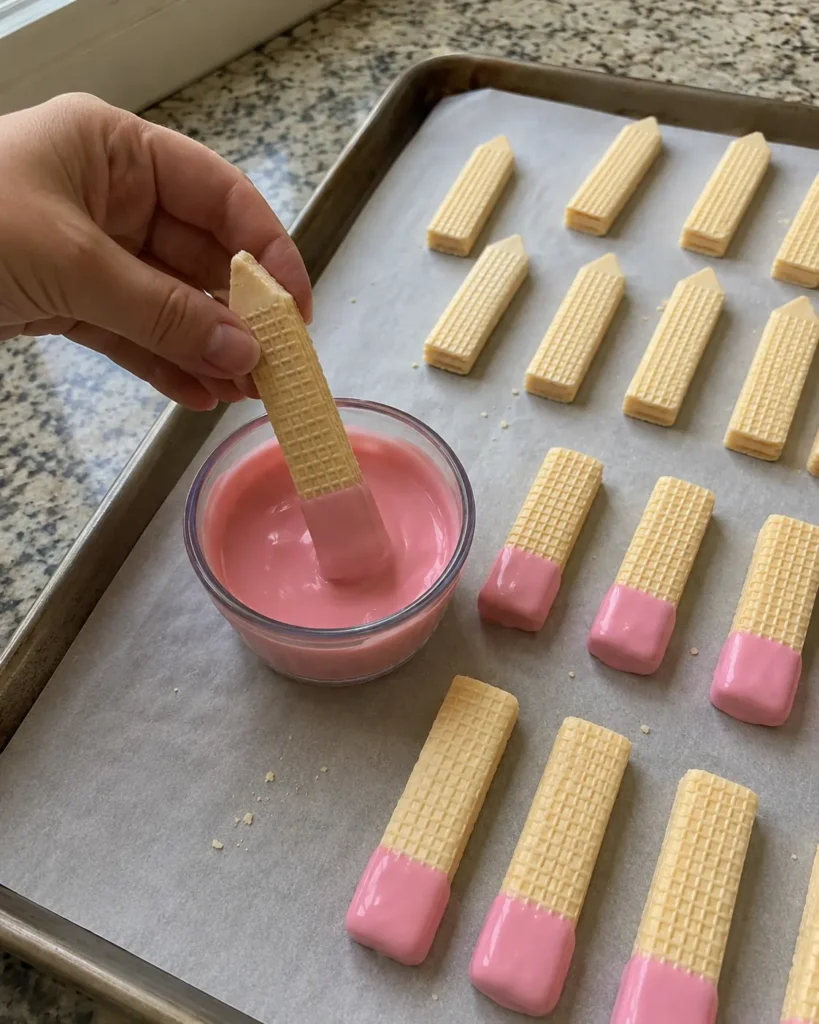
- Dip the flat ends. About a quarter-inch deep, straight in and straight out. Tap gently against the rim to shed the excess, then set on the parchment. Repeat for all 24, then let them set.
- Melt the white candy melts the same way, in a clean bowl.
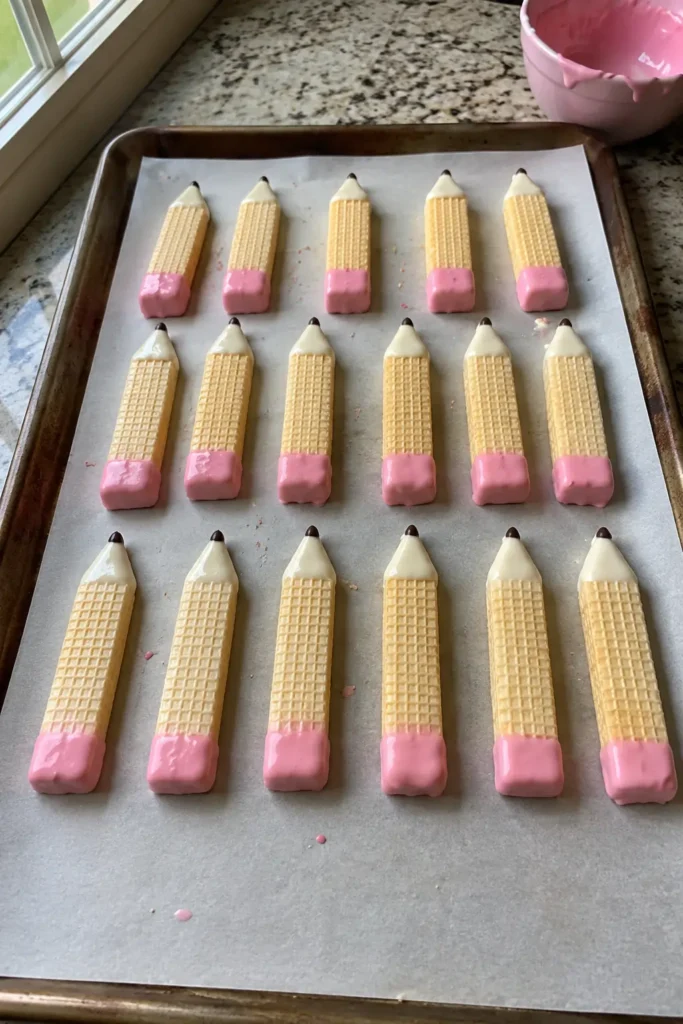
- Dip each point, then add the chip — one cookie at a time. Dip the tip, tap off the drips, place it on the parchment, and press a mini chocolate chip into the wet coating point-out. It has to happen while it’s still wet, so don’t batch this step.
- Let them set for 30 minutes at room temperature, or about 10 in the refrigerator. The coating is ready when it looks matte instead of glossy and feels firm to a light touch.
Beginner Tips for Best Results – Sugar Wafer Pencil Cookies
Use a narrow, deep container. A ramekin or a small glass beats a wide bowl. Depth is what gets you a clean tip.
Cut in from the sides, not down from the top. Two angled cuts meeting at a point, like sharpening a real pencil.
An adult does the cutting. These practically beg for kid help, and kids can absolutely dip and place the chips. The sharp serrated knife is not the part to hand over.
Work somewhere cool. A cold counter thickens the coating; a hot kitchen keeps it from setting. Room temperature is the target.
Common Mistakes to Avoid – Sugar Wafer Pencil Cookies
Using liquid food coloring. This is the big one. Water-based coloring makes candy coating seize into a grainy, unusable paste — it’s the same reason a stray drop of water ruins melted chocolate. Use gel or oil-based coloring, and if your coating goes thick on you, Wilton’s guide to thinning candy melts covers the fix (shortening, never oil or milk).
Overheating the coating. Scorched candy melts turn thick and dull and won’t recover. Low power, short bursts, and stir often — the residual heat finishes the job.
Dipping too deep. A half-coated pencil doesn’t read as a pencil. A quarter-inch is plenty at each end.
Batching the tip step. The chip has to go on while the white coating is wet. Dip one, chip it, set it down. Then the next.
Leaving them in a sunny spot. Candy coating melts. A tray left in a hot car will not survive the trip.
Easy Variations
Colored pencils. Skip pink entirely and dip the erasers in a rainbow of colors — a tray of mixed colored pencils is arguably cuter than the classic.
Personalized name pencils. Pipe each kid’s name down the barrel with cookie icing. Do this the same day you serve them, not the night before — icing is wet, and wet softens wafers.
Crayons and markers. Same cut, different colors. Nobody will notice the difference in effort.
Chocolate wafer version. A chocolate wafer with a bright pink eraser has the best contrast of any version.
Extra-fancy gift trays. Wrap them individually in cellophane favor bags with a ribbon, the same way you’d package pecan pie bark for the holidays.
What to Serve With Sugar Wafer Pencil Cookies
These are sweet and crisp, so they pair best with something cold and plain — a glass of milk is genuinely the right answer.
For a first-day-of-school breakfast tray, put them alongside strawberry yogurt pops with granola for something a little more substantial.
For lunchbox packing, one pencil cookie plus a couple of monster cookie protein balls makes a balanced-enough sweet corner.
For a bigger classroom spread, add a batch of no-bake peanut butter cheesecake balls — assuming your school allows peanut products, which many don’t.
Make-Ahead Tips – Sugar Wafer Pencil Cookies
You can make these a full day ahead without any loss of quality, which is the whole reason they work for a party morning.
Cut the tips up to two days early and keep them in an airtight container — that’s the slow, fiddly part, and getting it out of the way is a real gift to your future self.
One thing worth planning for: sugar wafers contain wheat and usually milk and soy, and candy melts commonly contain milk and soy. Since classroom parties are exactly what these are for, check with the teacher before you send a tray. FARE’s classroom food allergy resources are a good starting point, and roughly two kids per classroom have a food allergy.
How to Store Sugar Wafer Pencil Cookies
Store Sugar Wafer Pencil Cookies in an airtight container at room temperature, out of direct sunlight.
They’re best within 3 to 4 days, and still perfectly good up to a week. The limit here isn’t spoilage — nothing in these goes bad quickly. It’s the wafer slowly going soft, which is a texture problem, not a safety one.
Refrigerating works too and slightly extends the crisp window, though condensation on the way back to room temperature can dull the shine.
Can You Freeze Sugar Wafer Pencil Cookies?
Yes, and they hold up better than you’d expect.
Lay them flat in a single layer in a freezer bag, with parchment paper between any layers. They’ll keep for up to 3 months.
Thaw at room temperature for about 30 minutes before serving — still sealed, so condensation forms on the bag instead of on the cookies.
That said, these take 20 minutes to make from scratch. Freezing is more useful for leftovers than for planning ahead.
How to Reheat
Don’t. These are a no-bake treat and there’s nothing to reheat — warmth is the enemy here. Serve them at room temperature, straight from the container.
Nutrition Notes
Each pencil cookie lands somewhere around 120–135 calories, mostly from sugar. That’s a rough estimate — your actual numbers depend entirely on your wafer brand, how thickly you dipped, and how much coating stayed on.
These are a fun treat, not an everyday snack, and they’re honest about it. One per kid is plenty, which conveniently is also how you make a box stretch across a classroom.
Frequently Asked Questions – Sugar Wafer Pencil Cookies
How far in advance can I make Sugar Wafer Pencil Cookies?
Up to a day ahead with no downside, and up to a week if you’re storing them airtight and away from sunlight. For a class party, making them the night before is ideal.
Can I use white chocolate chips instead of candy melts?
You can, but candy melts are noticeably better here. Chocolate chips melt thicker, coat less evenly, and stay soft enough to smudge fingers. If chips are all you have, thin them with a little shortening.
Why did my candy coating turn thick and grainy?
It seized — almost always from liquid food coloring, a drop of water in the bowl, or overheating. Use gel or oil-based coloring only, keep the bowl bone dry, and melt at 50% power in short bursts.
Can kids help make Sugar Wafer Pencil Cookies?
Absolutely, and this is half the fun. An adult should handle the serrated knife, but dipping and placing the chocolate chips are perfect kid jobs.
Are these gluten-free?
Not as written — standard sugar wafers contain wheat. Gluten-free wafer cookies are easy to find and work exactly the same way.
Will they melt in a lunchbox?
Candy coating holds firm at normal room temperature but softens in real heat. In a hot car or a sunny classroom in early September, they’ll suffer. An ice pack in the lunchbox solves it.
How many should I make for a classroom?
Twenty-four covers most classes with a couple to spare. The recipe doubles perfectly — one reader of the original technique reported making 100 in about an hour once she had a rhythm going.
Final Thoughts – Sugar Wafer Pencil Cookies
There’s something satisfying about a recipe this honest. Four ingredients, one sharp knife, twenty minutes — and a tray of Sugar Wafer Pencil Cookies that makes a kid’s whole morning.
Make them the night before the first day. Let someone small press the chocolate chips on. That’s the entire point.
If you liked how easy this was, dandy do cookies are the same kind of no-bake, no-stress project.
Print
Sugar Wafer Pencil Cookies
- Total Time: 50 minutes
- Yield: 24 cookies 1x
- Diet: Vegetarian
Description
These Sugar Wafer Pencil Cookies are an easy no-bake back-to-school treat made with just 4 ingredients. Store-bought sugar wafers get trimmed to a point and dipped in candy melts to look like sharpened pencils — perfect for classroom parties, teacher gifts, and lunchboxes. Twenty minutes of hands-on work, plus 30 minutes to set.
Ingredients
24 vanilla creme sugar wafer cookies
1/2 cup white candy melts
1/2 cup pink candy melts
24 mini chocolate chips
Instructions
1. Line a baking sheet with parchment paper and set it within easy reach.
2. Using a sharp serrated knife, score lightly then cut two diagonal lines from one end of each wafer to form a point. Cut all 24 before you melt anything. Brush away crumbs.
3. Melt the pink candy melts in a narrow microwave-safe container at 50% power in 30-second bursts, stirring between each, until smooth and pudding-like.
4. Dip the flat end of each wafer about 1/4 inch into the pink coating. Tap off the excess and set on the parchment. Repeat for all 24, then let them set.
5. Melt the white candy melts the same way in a clean, dry container.
6. Working one cookie at a time, dip the pointed end into the white coating, tap off drips, set on parchment, and immediately press a mini chocolate chip into the wet tip point-outward.
7. Let set 30 minutes at room temperature, or about 10 minutes in the refrigerator. The coating is ready when it looks matte and feels firm.
Notes
Use a sharp serrated knife. A dull knife crushes the wafer rather than cutting it.
Never use liquid food coloring to tint candy melts — it will seize the coating into a grainy paste. Gel or oil-based coloring only.
Don’t batch step 6. The mini chocolate chip must be pressed on while the white coating is still wet.
Total time includes 30 minutes of hands-off setting. Active work is about 20 minutes.
Storage: Airtight container at room temperature, out of direct sunlight. Best within 3-4 days, good up to 1 week.
Freezing: Lay flat in a freezer bag with parchment between layers, up to 3 months. Thaw sealed at room temperature for 30 minutes.
Allergens: Contains wheat, and typically milk and soy. Check with your school before sending these to a classroom.
Kid safety: An adult should do all of the cutting. Kids can dip and place the chocolate chips.
- Prep Time: 20 minutes
- Cook Time: 0 minutes
- Category: Dessert
- Method: No-Bake
- Cuisine: American
Nutrition
- Serving Size: 1 cookie
- Calories: 125 kcal
- Sugar: 13g
- Sodium: 24mg
- Fat: 7g
- Saturated Fat: 4.5g
- Unsaturated Fat: 2.2g
- Trans Fat: 0g
- Carbohydrates: 16g
- Fiber: 0.3g
- Protein: 1g
- Cholesterol: 2mg
Print and Save These Sugar Wafer Pencil Cookies
If this fits your back-to-school routine, print it or save it now — you’ll want it again next August, and again the August after that. It’s the kind of recipe that quietly becomes a tradition because it never fails and it always gets a reaction.